> ## Documentation Index
> Fetch the complete documentation index at: https://help2.studystash.com/llms.txt
> Use this file to discover all available pages before exploring further.

# SSO Setup Guide

> If you encounter any issues or need additional assistance, we offer a free setup call.You can submit a support request at support@studystash.com.

<Note>
  If you encounter any issues or need additional assistance, we offer a free setup call.<br />You can submit a support request at [support@studystash.com](mailto:support@studystash.com).
</Note>

***

## Step 1: University provides StudyStash with Identity Provider (IdP) information

Fill out the following form to provide details to our team:

[https://internal.support.studystash.com/servicedesk/customer/portal/34/create/158](https://internal.support.studystash.com/servicedesk/customer/portal/34/create/158)

Alternatively you can contact us at [support@studystash.com](mailto:support@studystash.com) with this information if you would prefer.

<Note>
  **Note -** Providing StudyStash with a user account allows us to test that SSO has been set up correctly, and more easily troubleshoot any issues that arise.
</Note>

## Step 2: StudyStash provides Service Provider (SP) information

Once we have received the form above our team will be able to provide you with a URL containing our Service Provider metadata document (XML).

**StudyStash will provide:**

<table>
  <tbody>
    <tr>
      <th />

      <th />
    </tr>

    <tr>
      <td>
        <p>Reply URL (Assertion Consumer Service URL)</p>
      </td>

      <td>
        <p>To be provided by StudyStash after completion of SSO Configuration form</p>
      </td>
    </tr>

    <tr>
      <td>
        <p>Identifier (Entity ID)</p>
      </td>

      <td>
        <p>To be provided by StudyStash after completion of SSO Configuration form</p>
      </td>
    </tr>

    <tr>
      <td>
        <p>Required NameId policy:</p>
      </td>

      <td>
        <p><code>urn:oasis:names:tc:SAML:1.1:nameid-format:emailAddress</code></p>
      </td>
    </tr>

    <tr>
      <td>
        <p>Required Attributes:</p>
      </td>

      <td>
        <p><strong>Email Address</strong></p>

        <ul><li><p>Claim name: <code>urn:oid:0.9.2342.19200300.100.1.3</code></p></li><li><p>Value: <code>user.mail</code></p></li></ul>
      </td>
    </tr>

    <tr>
      <td>
        <p>Optional Attributes:</p>
      </td>

      <td>
        <p><strong>First name</strong></p>

        <ul><li><p>Claim name: <code>urn:oid:2.5.4.42</code></p></li><li><p>Value: <code>user.givenName</code></p></li></ul>

        <p><strong>Last name</strong></p>

        <ul><li><p>Claim name: <code>urn:oid:2.5.4.4</code></p></li><li><p>Value: <code>user.sn</code></p></li></ul>
      </td>
    </tr>
  </tbody>
</table>

**University to Provide:**

<table>
  <tbody>
    <tr>
      <th />

      <th />
    </tr>

    <tr>
      <td>
        <p>App Federation <strong>Metadata Url</strong></p>
      </td>

      <td>
        <p>To be provided to StudyStash</p>
      </td>
    </tr>
  </tbody>
</table>

## **Example: Azure Active Directory**

The following steps are required to set up StudyStash as a service provider with Azure Active Directory (also known as *Microsoft Entra ID*):

### 3.1) Create a new Enterprise Application

1. Navigate to the [<u>Microsoft Azure portal</u>](https://azure.microsoft.com/en-us/get-started/azure-portal) and sign in as a user with permissions to create enterprise applications.

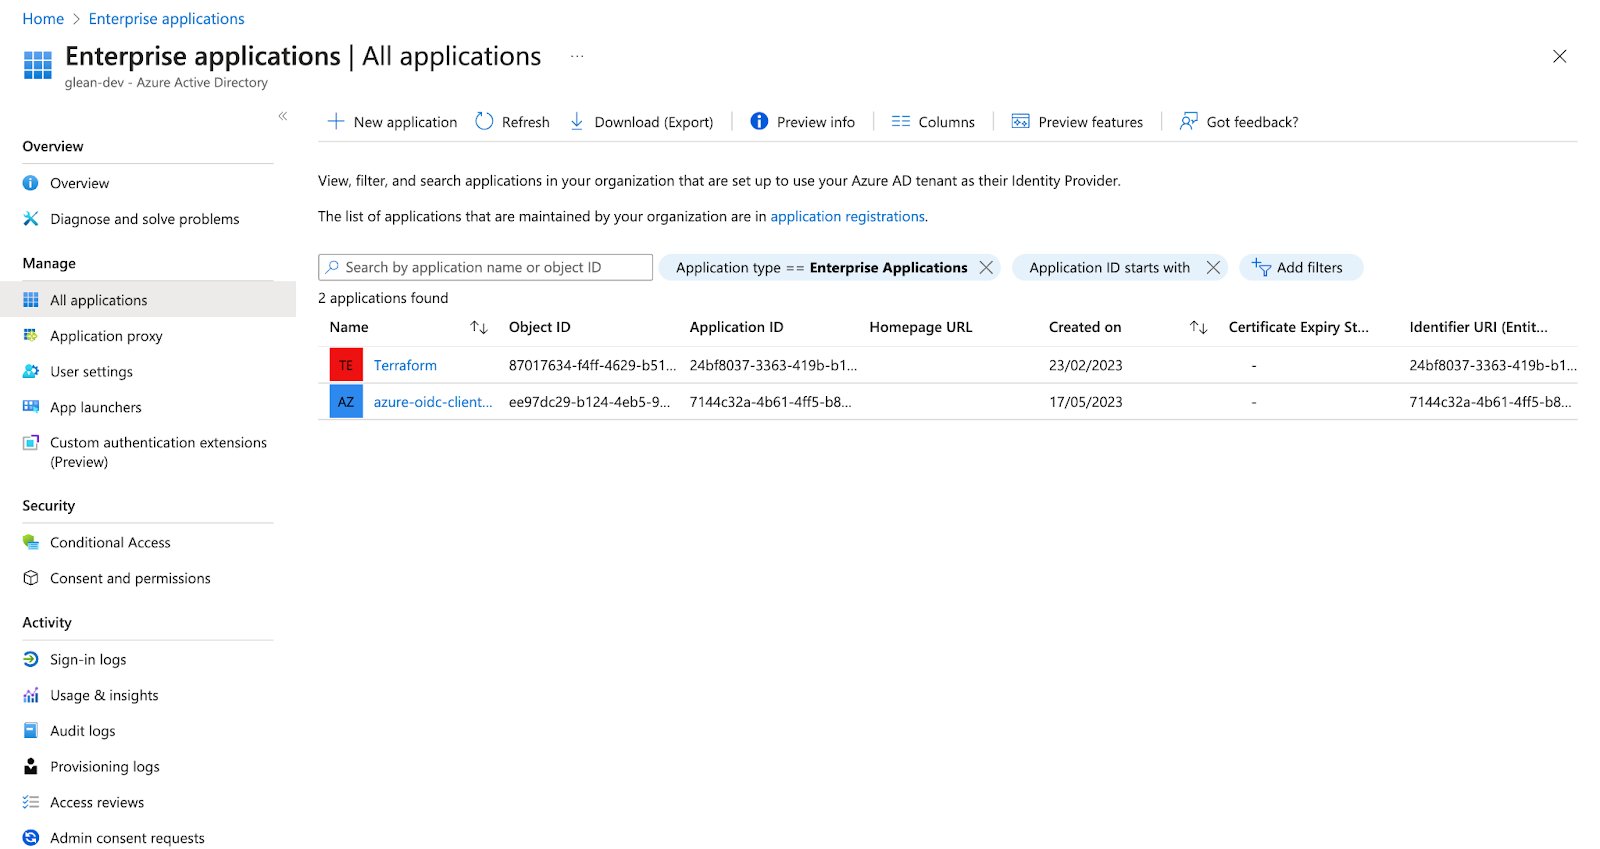
2. Under the **Azure Services** section, find and select **Enterprise applications**. You may have to go to the [**<u>All services</u>**](https://portal.azure.com/#allservices) page and then scroll down to the **Identity** section to find it.

<Frame className="ss-screenshot" caption={"**Figure 1.** SSO Setup Guide — screenshot"}>
  <img loading="lazy" src="https://mintcdn.com/studystash-help/FFz54l9hIeIDPaHl/assets/7373377/7340370-image-20250810-182919.png?fit=max&auto=format&n=FFz54l9hIeIDPaHl&q=85&s=e323006c0369c449b2393609e916b754" alt="SSO Setup Guide — screenshot" width="1600" height="849" data-path="assets/7373377/7340370-image-20250810-182919.png" />
</Frame>

3. Select **New application**. You'll be redirected to the **Browse Microsoft Entra Gallery** page.

4. Select **Create your own application**.
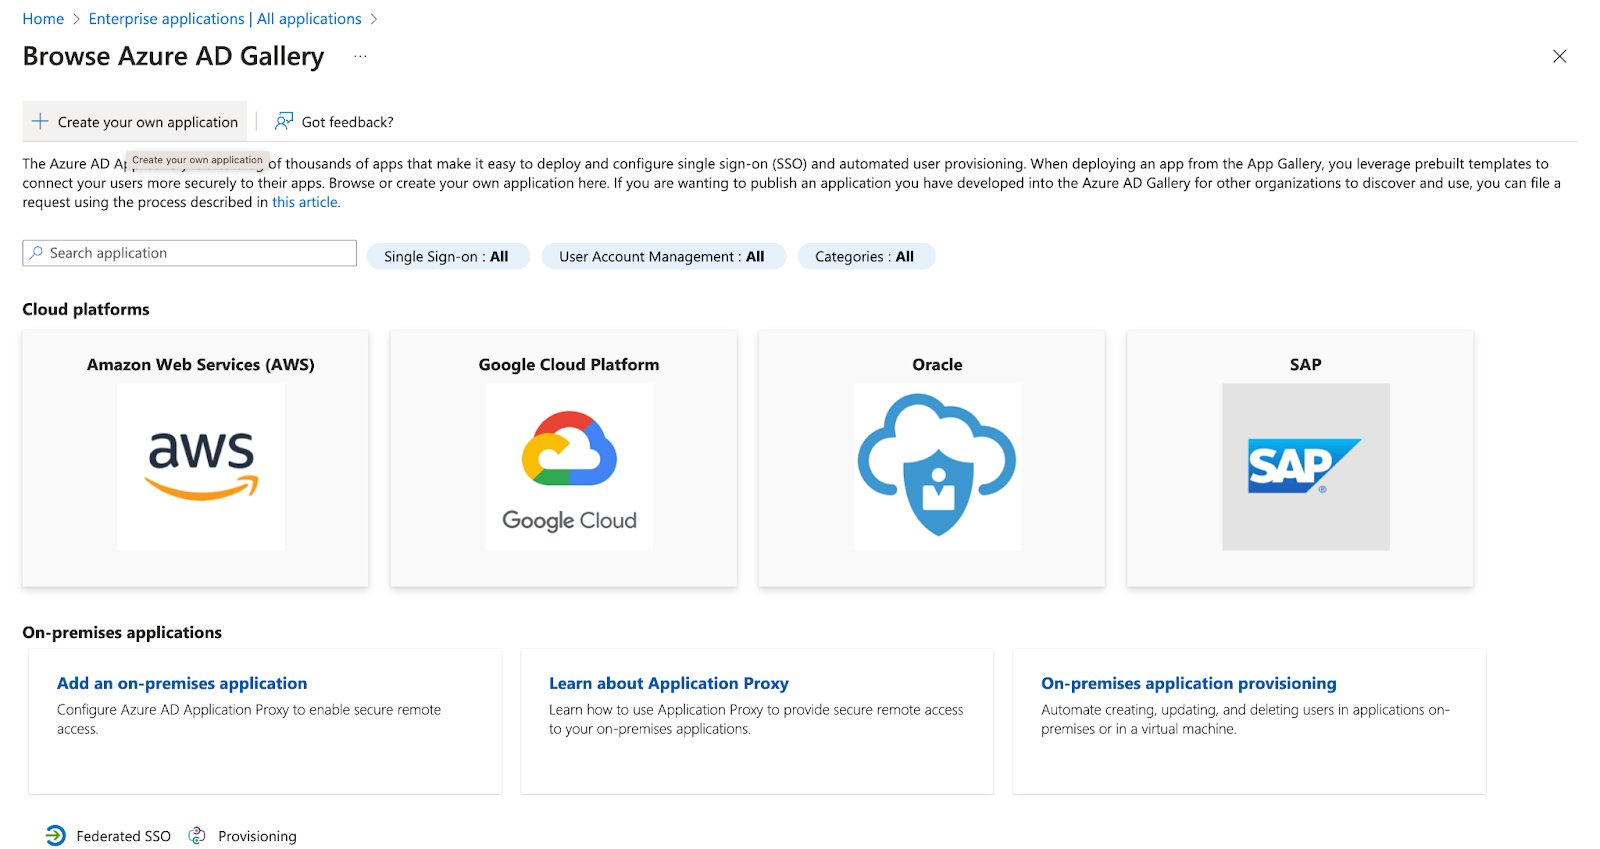
<Frame className="ss-screenshot" caption={"**Figure 2.** SSO Setup Guide — screenshot"}>
  <img loading="lazy" src="https://mintcdn.com/studystash-help/FFz54l9hIeIDPaHl/assets/7373377/7373399-image-20250810-182934.png?fit=max&auto=format&n=FFz54l9hIeIDPaHl&q=85&s=ec9413d8a4f213bbeaf7b2f1ebce0b89" alt="SSO Setup Guide — screenshot" width="1600" height="849" data-path="assets/7373377/7373399-image-20250810-182934.png" />
</Frame>

4. In the popup that opens:

   1. Provide a **name** of the application (StudyStash).

   2. Select "**Integrate any other application you don’t find in the gallery (Non-gallery)**".

   3. Click “**Create**”.
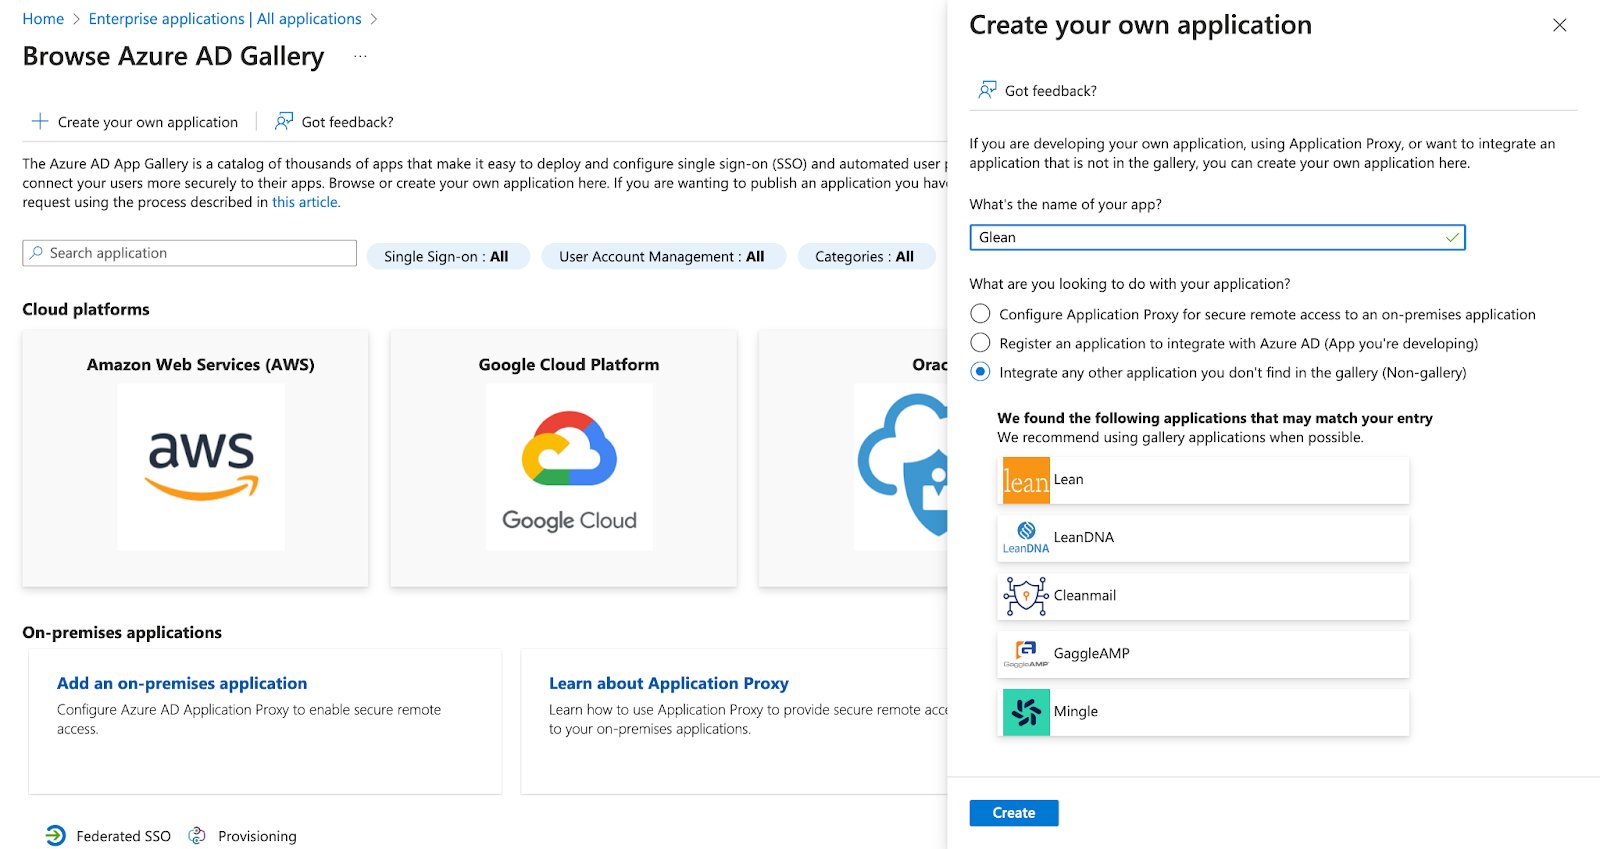
<Frame className="ss-screenshot" caption={"**Figure 3.** SSO Setup Guide — screenshot"}>
  <img loading="lazy" src="https://mintcdn.com/studystash-help/FFz54l9hIeIDPaHl/assets/7373377/7373406-image-20250810-183208.png?fit=max&auto=format&n=FFz54l9hIeIDPaHl&q=85&s=05db563554e304c9b2a762fcf5573f8e" alt="SSO Setup Guide — screenshot" width="1600" height="849" data-path="assets/7373377/7373406-image-20250810-183208.png" />
</Frame>

### 3.2) **Assign users or groups**

Now the enterprise app is created, you need to assign users or groups before they can use it to log in. More details are provided from Microsoft:

[https://learn.microsoft.com/en-us/entra/identity/enterprise-apps/assign-user-or-group-access-portal?pivots=portal](https://learn.microsoft.com/en-us/entra/identity/enterprise-apps/assign-user-or-group-access-portal?pivots=portal)

### 3.3) **Set Basic SAML Configuration**

1. Select the **Single sign-on option** in the **Manage menu** and choose **SAML**. You'll be redirected to the **Set up Single Sign-On with SAML** page.
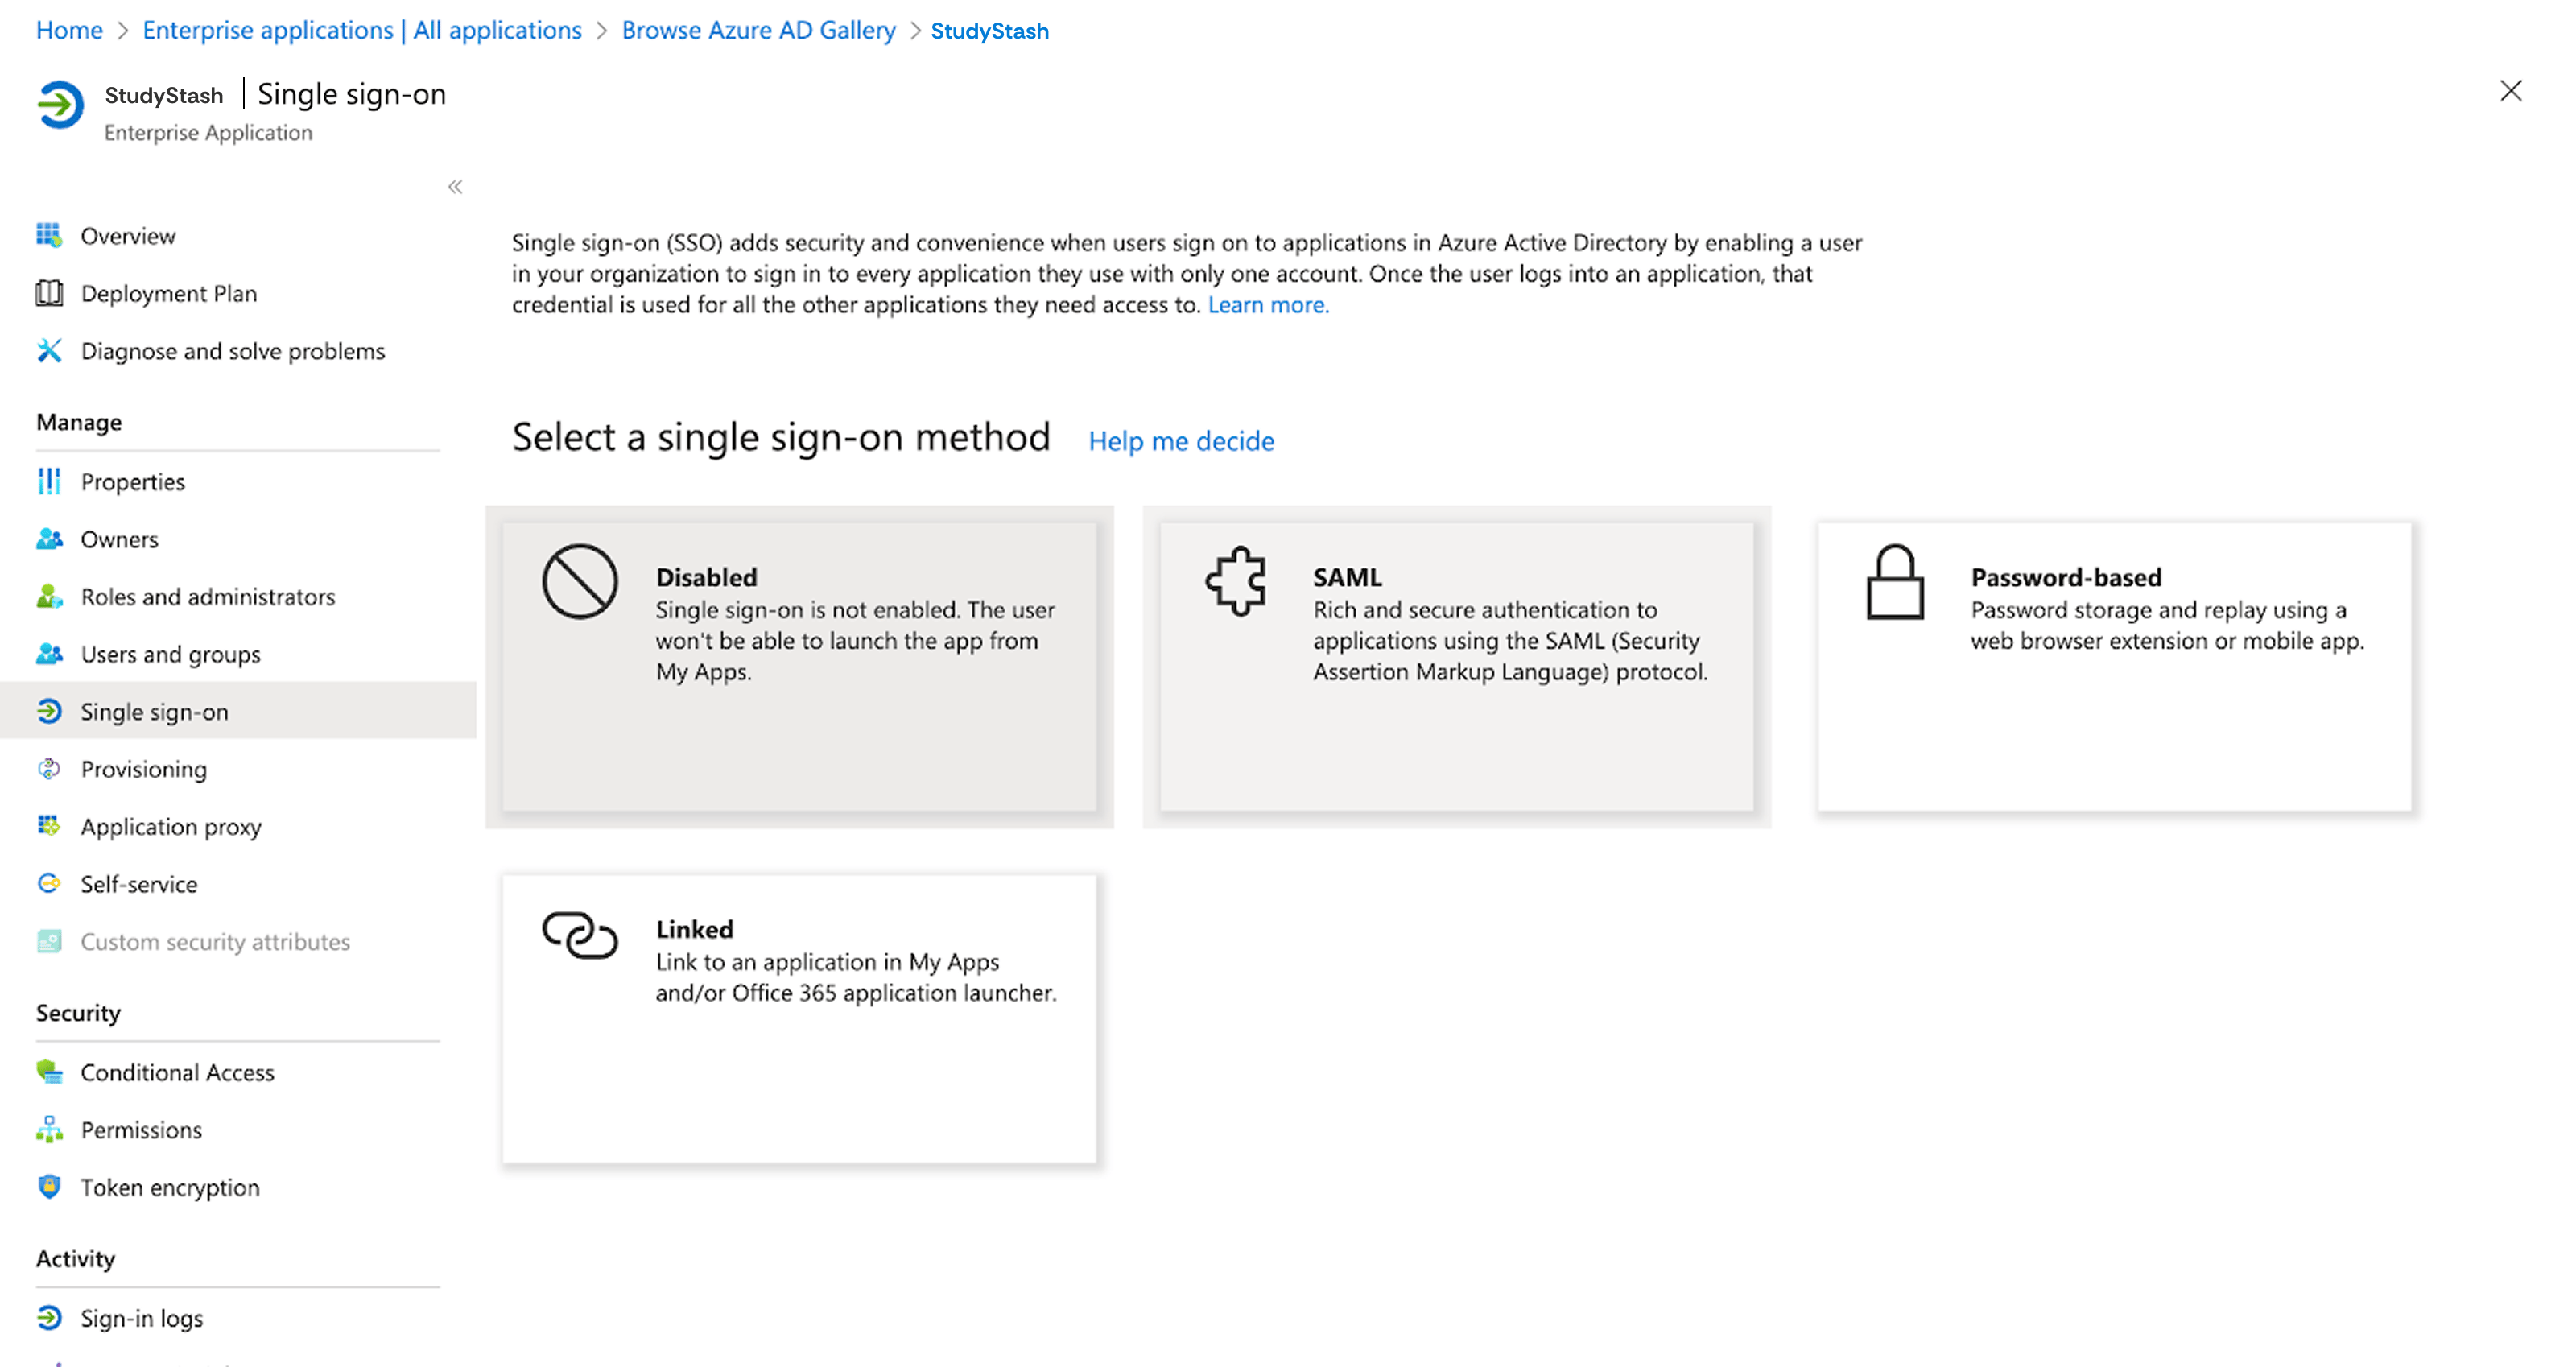
<Frame className="ss-screenshot" caption={"**Figure 4.** SSO Setup Guide — screenshot 4"}>
  <img loading="lazy" src="https://mintcdn.com/studystash-help/FFz54l9hIeIDPaHl/assets/7373377/7340379-saml.png?fit=max&auto=format&n=FFz54l9hIeIDPaHl&q=85&s=3e3f67e8305f161a3fa92e3d20f7aca7" alt="SSO Setup Guide — screenshot 4" width="3200" height="1698" data-path="assets/7373377/7340379-saml.png" />
</Frame>

2. Find the **Basic SAML Configuration** section.

3. Select **Edit**. The **Basic SAML Configuration** panel will open.

4. Add the provided **Identifier (Entity ID)** and **Reply URL (Assertion Consumer Service URL)** values. These values will be saved automatically.

<table>
  <tbody>
    <tr>
      <th>
        <p><strong>Field</strong></p>
      </th>

      <th>
        <p><strong>Value</strong></p>
      </th>
    </tr>

    <tr>
      <td>
        <p>Reply URL (Assertion Consumer Service URL)</p>
      </td>

      <td>
        <p>Example:<br /><code>[https://sso.studystash.com/proxy/acs](https://sso.studystash.com/proxy/acs)</code></p>
      </td>
    </tr>

    <tr>
      <td>
        <p>Identifier (Entity ID)</p>
      </td>

      <td>
        <p>Example:<br /><code>[https://sso.studystash.com/metadata](https://sso.studystash.com/metadata)</code></p>
      </td>
    </tr>
  </tbody>
</table>

5. Select **Save** at the top of the panel. Close the panel.

### 3.4) **Verify correct configuration of attributes and claims**

1. Still on the **Set up Single Sign-On with SAML** page, find the **Attributes & Claims** section.

2. Select **Edit**.

3. Verify the following attributes and values are present:

<table>
  <tbody>
    <tr>
      <td>
        <p>Required Attributes:</p>
      </td>

      <td>
        <p><strong>Email Address</strong></p>

        <ul><li><p>Claim name: <code>urn:oid:0.9.2342.19200300.100.1.3</code></p></li><li><p>Value: <code>user.mail</code></p></li></ul>
      </td>
    </tr>

    <tr>
      <td>
        <p>Optional Attributes:</p>
      </td>

      <td>
        <p><strong>First name</strong></p>

        <ul><li><p>Claim name: <code>urn:oid:2.5.4.42</code></p></li><li><p>Value: <code>user.givenName</code></p></li></ul>

        <p><strong>Last name</strong></p>

        <ul><li><p>Claim name: <code>urn:oid:2.5.4.4</code></p></li><li><p>Value: <code>user.sn</code></p></li></ul>
      </td>
    </tr>
  </tbody>
</table>

### 3.5) **Share the application's metadata URL**

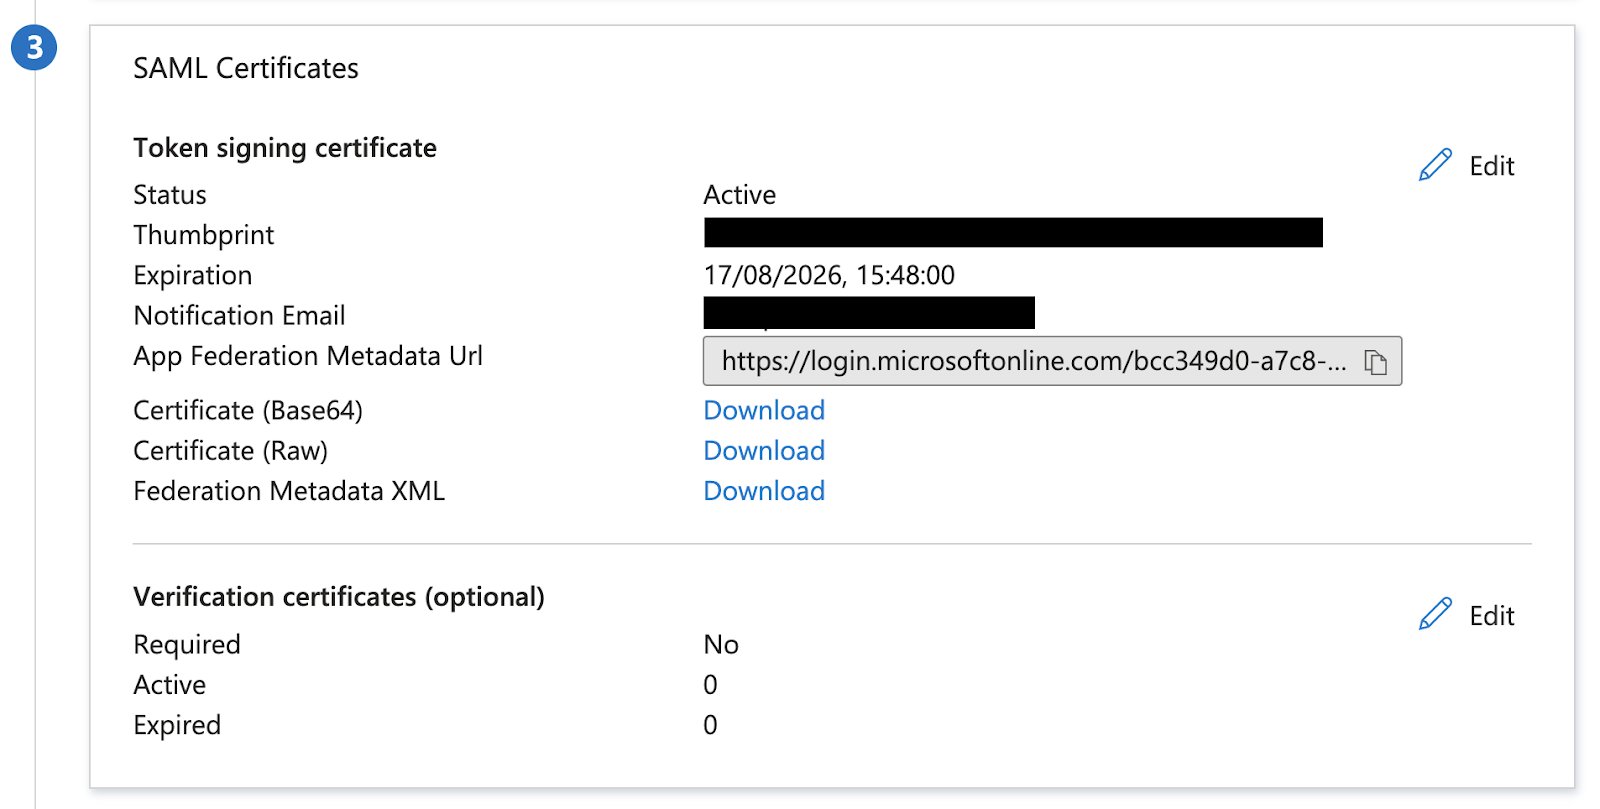
1. Still on the **Set up Single Sign-On with SAML** page, find the **SAML Certificates** section.

2. Copy the **App Federation Metadata Url**, and send this to your StudyStash contact. This is the final piece of information we need to enable SAML.

<Frame className="ss-screenshot" caption={"**Figure 5.** SSO Setup Guide — screenshot"}>
  <img loading="lazy" src="https://mintcdn.com/studystash-help/FFz54l9hIeIDPaHl/assets/7373377/7373413-image-20250810-183607.png?fit=max&auto=format&n=FFz54l9hIeIDPaHl&q=85&s=dcb3e354e4de5b329a173a1eff3dcc8c" alt="SSO Setup Guide — screenshot" width="1600" height="809" data-path="assets/7373377/7373413-image-20250810-183607.png" />
</Frame>

3. The setup is now complete!


This documentation is built and hosted on [Mintlify](https://mintlify.com), a developer documentation platform.