> ## Documentation Index
> Fetch the complete documentation index at: https://help2.studystash.com/llms.txt
> Use this file to discover all available pages before exploring further.

# Moodle LTI Integration Guide (LTI)

> Follow this installation guide to integrate StudyStash with Moodle using manual registration.

<Info>For institution administrators. Check the permissions below before you begin.</Info>

## Prerequisites

You must have Moodle administrative access with the ability to manage LTI Advantage tools.

***

<Steps>
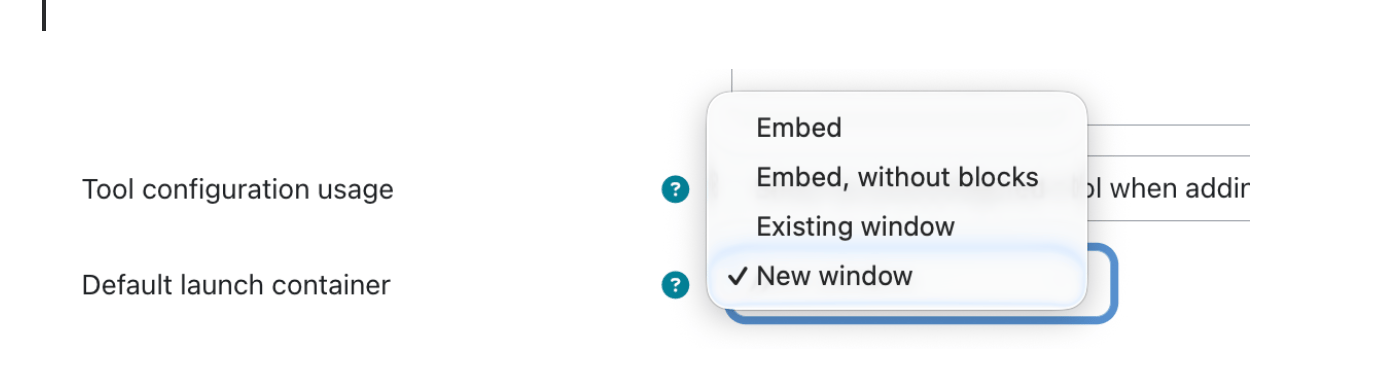
  <Step titleSize="h2" title="Create a new ‘External Tool' in Moodle">
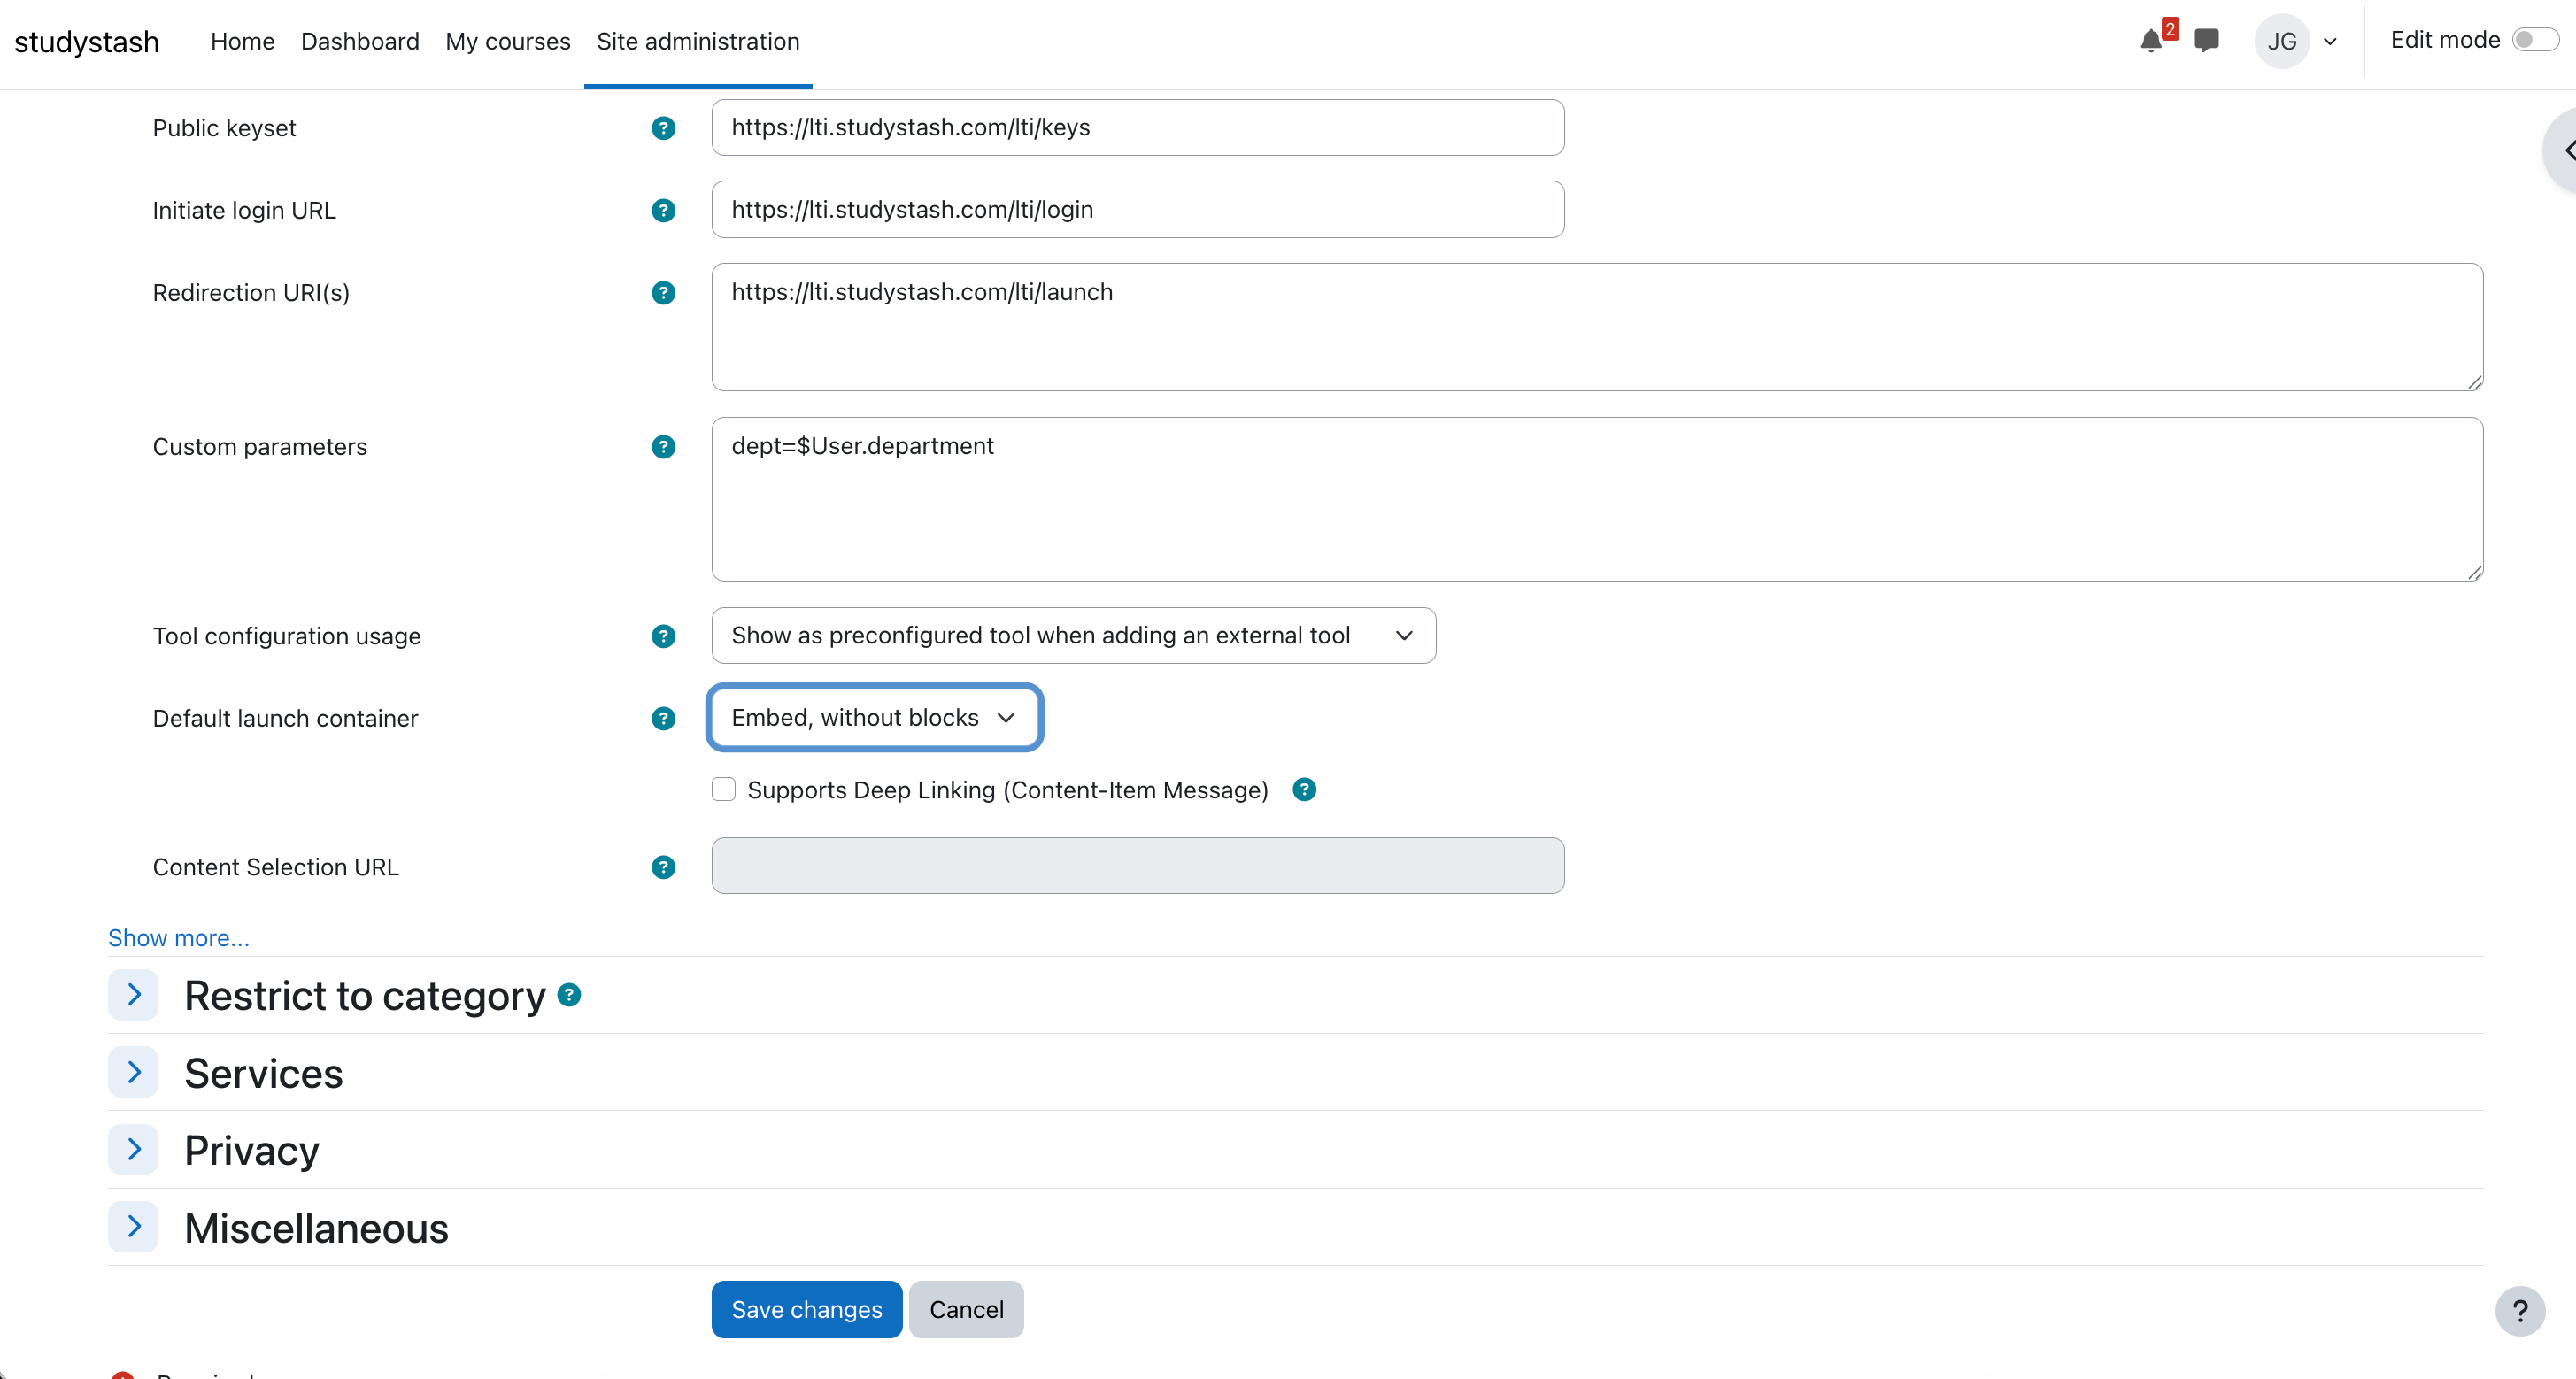
    1. Inside Moodle, navigate to ‘**Site administration**' -> ‘**Plugins**' → **‘Activity modules’** → **'External tool’** → **'Manage tools’**

    2. Click the '**Configure a tool manually**' link<br />

           <Frame className="ss-screenshot" caption={"**Figure 1.** Moodle LTI Integration Guide (LTI) — screenshot 1"}>
             <img loading="lazy" src="https://mintcdn.com/studystash-help/FFz54l9hIeIDPaHl/assets/202145796/202145824-moodle-configure.png?fit=max&auto=format&n=FFz54l9hIeIDPaHl&q=85&s=4960ef776a350dc9cbcfc803e7a10f91" alt="Moodle LTI Integration Guide (LTI) — screenshot 1" width="1063" height="257" data-path="assets/202145796/202145824-moodle-configure.png" />
           </Frame>

    3. Enter the following information in ***Tool Settings***:

    <table>
      <tbody>
        <tr>
          <th>
            <p><strong>Field</strong></p>
          </th>

          <th>
            <p><strong>Value</strong></p>
          </th>
        </tr>

        <tr>
          <td>
            <p>Tool name</p>
          </td>

          <td>
            <p>StudyStash</p>
          </td>
        </tr>

        <tr>
          <td>
            <p>Tool URL</p>
          </td>

          <td>
            <p><code>[https://lti.studystash.com/lti/launch](https://lti.studystash.com/lti/launch)</code></p>
          </td>
        </tr>

        <tr>
          <td>
            <p>Tool description</p>
          </td>

          <td>
            <p>Safe, AI-Powered Learning, all within your LMS</p>
          </td>
        </tr>

        <tr>
          <td>
            <p>LTI Version</p>
          </td>

          <td>
            <p>LTI 1.3</p>
          </td>
        </tr>

        <tr>
          <td>
            <p>Public key type</p>
          </td>

          <td>
            <p>Keyset URL</p>
          </td>
        </tr>

        <tr>
          <td>
            <p>Public keyset</p>
          </td>

          <td>
            <p><code>[https://lti.studystash.com/lti/keys](https://lti.studystash.com/lti/keys)</code></p>
          </td>
        </tr>

        <tr>
          <td>
            <p>Initiate login URL</p>
          </td>

          <td>
            <p><code>[https://lti.studystash.com/lti/login](https://lti.studystash.com/lti/login)</code></p>
          </td>
        </tr>

        <tr>
          <td>
            <p>Redirection URI(s)</p>
          </td>

          <td>
            <p><code>[https://lti.studystash.com/lti/launch](https://lti.studystash.com/lti/launch)</code></p>
          </td>
        </tr>

        <tr>
          <td>
            <p>Tool configuration usage</p>
          </td>

          <td>
            <p>Show in activity chooser as a preconfigured tool</p>
          </td>
        </tr>

        <tr>
          <td>
            <p>Default launch container</p>
          </td>

          <td>
            <p>Choose from one of the following options:</p>

            <ul><li><p><strong>Embed</strong> - The tool is displayed within the existing Moodle window, in a manner similar to most other Activity types.</p></li><li><p><strong>Embed, without blocks</strong> - The tool is displayed within the existing Moodle window, with just the navigation controls at the top of the page. This allows StudyStash to open in a new window and is recommended. See Step 3.</p></li></ul>
          </td>
        </tr>

        <tr>
          <td>
            <p>Icon URL</p>
          </td>

          <td>
            <p><a href="https://studystash.com/loop.png">[https://studystash.com/loop.png](https://studystash.com/loop.png)</a></p>
          </td>
        </tr>

        <tr>
          <td>
            <p>Secure icon URL</p>
          </td>

          <td>
            <p><a href="https://studystash.com/loop.png">[https://studystash.com/loop.png](https://studystash.com/loop.png)</a></p>
          </td>
        </tr>
      </tbody>
    </table>

    4. Enter the following information in ***Services***:

    <table>
      <tbody>
        <tr>
          <th>
            <p><strong>Field</strong></p>
          </th>

          <th>
            <p><strong>Value</strong></p>
          </th>
        </tr>

        <tr>
          <td>
            <p>IMS LTI Assignment and Grade Services</p>
          </td>

          <td>
            <p>Do not use this service</p>
          </td>
        </tr>

        <tr>
          <td>
            <p>IMS LTI Names and Role Provisioning</p>
          </td>

          <td>
            <p>Use this service to retrieve members' information as per privacy settings</p>
          </td>
        </tr>

        <tr>
          <td>
            <p>Tool Settings</p>
          </td>

          <td>
            <p>Use this service</p>
          </td>
        </tr>
      </tbody>
    </table>

    5. Enter the following information in ***Privacy***:

    <table>
      <tbody>
        <tr>
          <th>
            <p><strong>Field</strong></p>
          </th>

          <th>
            <p><strong>Value</strong></p>
          </th>
        </tr>

        <tr>
          <td>
            <p>Share launcher's name with tool</p>
          </td>

          <td>
            <p>Always</p>
          </td>
        </tr>

        <tr>
          <td>
            <p>Share launcher's email with tool</p>
          </td>

          <td>
            <p>Always</p>
          </td>
        </tr>

        <tr>
          <td>
            <p>Accept grades from the tool</p>
          </td>

          <td>
            <p>As specified in Deep Linking definition or Delegate to teacher</p>
          </td>
        </tr>

        <tr>
          <td>
            <p>Force SSL</p>
          </td>

          <td>
            <p>✅  Checked</p>
          </td>
        </tr>
      </tbody>
    </table>

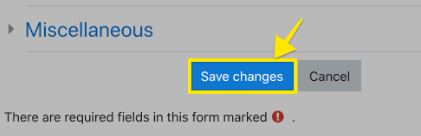
    6. Click the **Save** button<strong>:</strong><br />

           <Frame className="ss-screenshot" caption={"**Figure 2.** Moodle LTI Integration Guide (LTI) — screenshot"}>
             <img loading="lazy" src="https://mintcdn.com/studystash-help/FFz54l9hIeIDPaHl/assets/202145796/202145821-screenshot-2026-01-06-at-22-41-40.png?fit=max&auto=format&n=FFz54l9hIeIDPaHl&q=85&s=e9105a6445e420d6f2131a536c608a46" alt="Moodle LTI Integration Guide (LTI) — screenshot" width="421" height="136" data-path="assets/202145796/202145821-screenshot-2026-01-06-at-22-41-40.png" />
           </Frame>

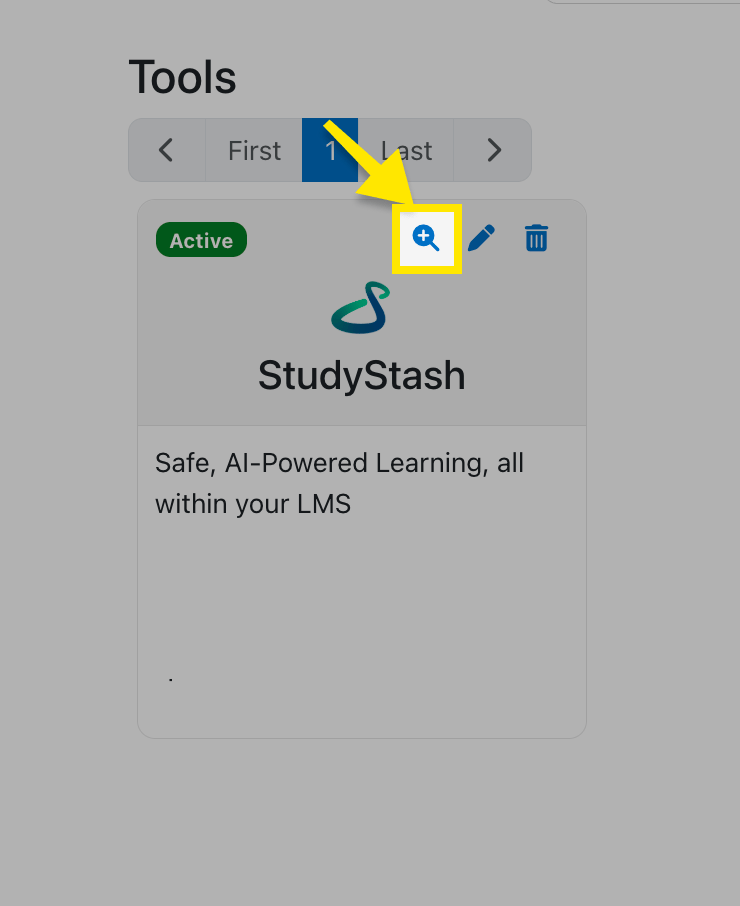
    7. On the **Manage tools** page, locate **StudyStash** and select the **View configuration details** icon.
    <Frame className="ss-screenshot" caption={"**Figure 3.** Moodle LTI Integration Guide (LTI) — screenshot"}>
      <img loading="lazy" src="https://mintcdn.com/studystash-help/FFz54l9hIeIDPaHl/assets/202145796/202342448-image-20260928-154355.png?fit=max&auto=format&n=FFz54l9hIeIDPaHl&q=85&s=5c71ac769af15ca2022bf805d68f7879" alt="Moodle LTI Integration Guide (LTI) — screenshot" width="740" height="906" data-path="assets/202145796/202342448-image-20260928-154355.png" />
    </Frame>

    8. Copy the **Client ID** and **Deployment ID** displayed in the configuration details. You will need both values in Step 2.
  </Step>

  <Step titleSize="h2" title="Add your Moodle deployment to StudyStash">
    Before end users can launch StudyStash from Moodle, add the Moodle deployment in the [StudyStash Admin Dashboard](https://studystash.com/admin).

    1. Sign in to the [StudyStash Admin Dashboard](https://studystash.com/admin).

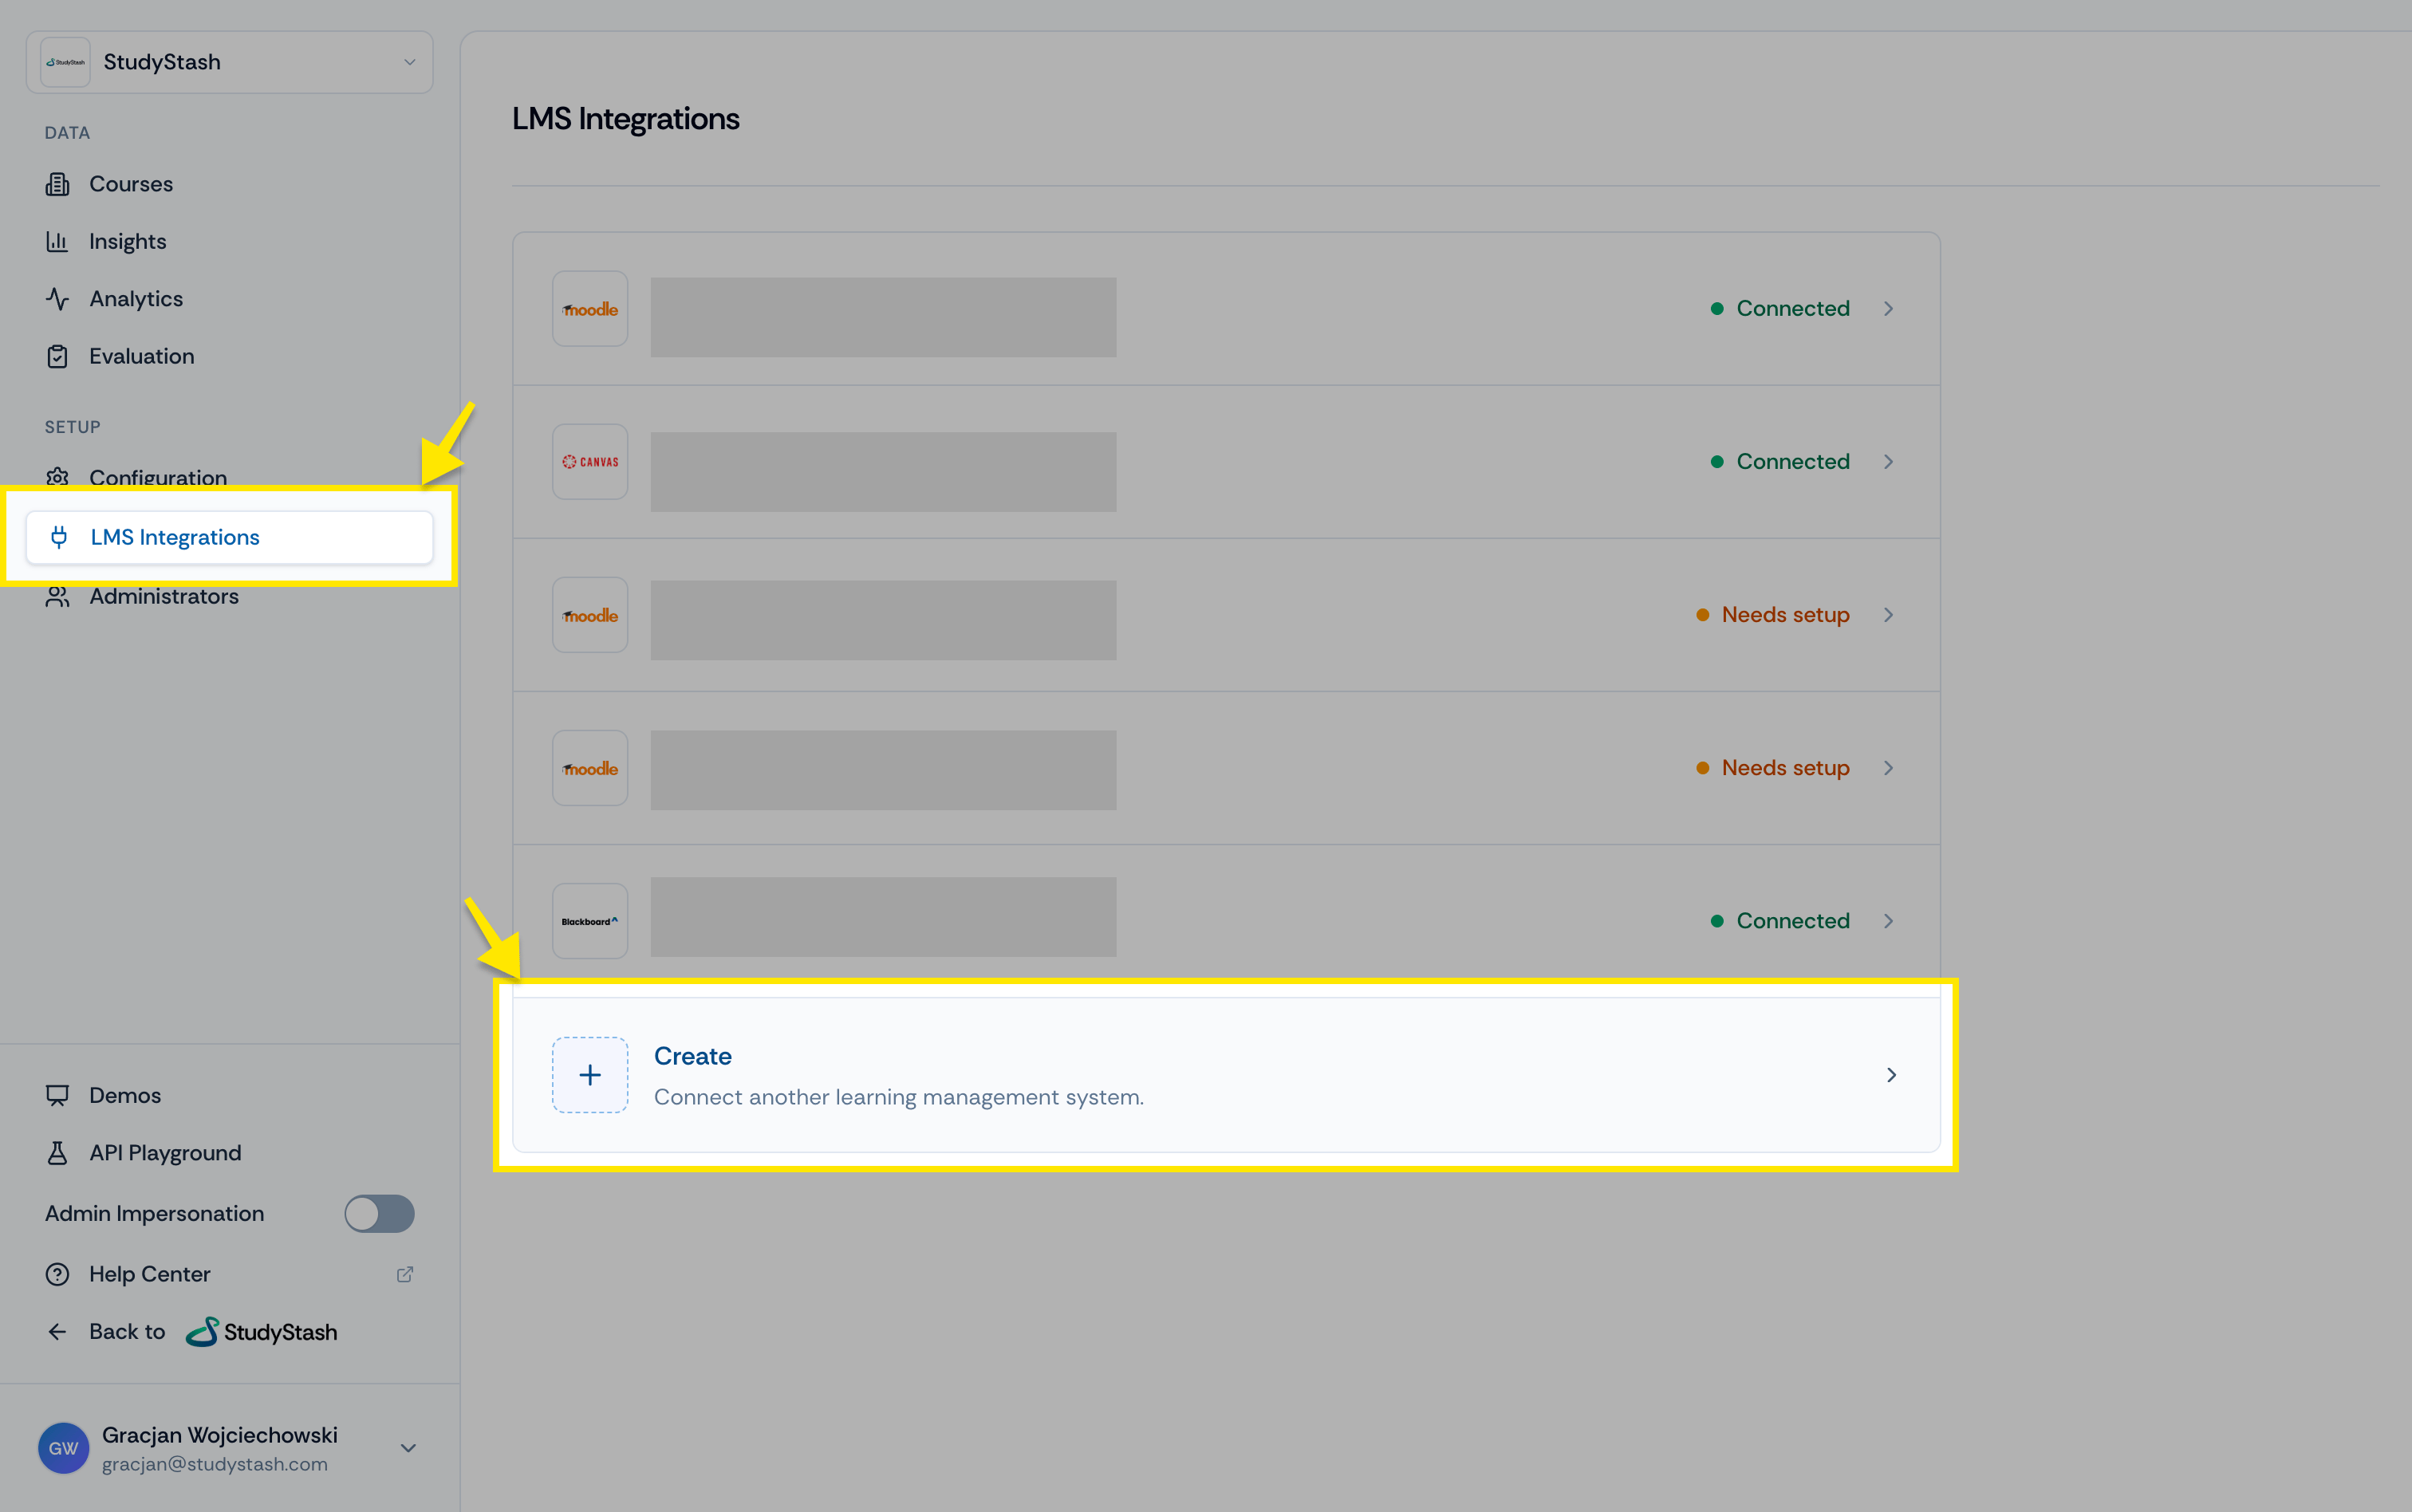
    2. Under **Setup**, select **LMS Integrations**, then select **Create**.

    <Frame className="ss-screenshot" caption={"**Figure 4.** Moodle LTI Integration Guide (LTI) — screenshot"}>
      <img loading="lazy" src="https://mintcdn.com/studystash-help/FFz54l9hIeIDPaHl/assets/202145796/202473493-image-20260928-151614.png?fit=max&auto=format&n=FFz54l9hIeIDPaHl&q=85&s=058cfea38e19fcdd412da89b0ea34294" alt="Moodle LTI Integration Guide (LTI) — screenshot" width="3024" height="1896" data-path="assets/202145796/202473493-image-20260928-151614.png" />
    </Frame>

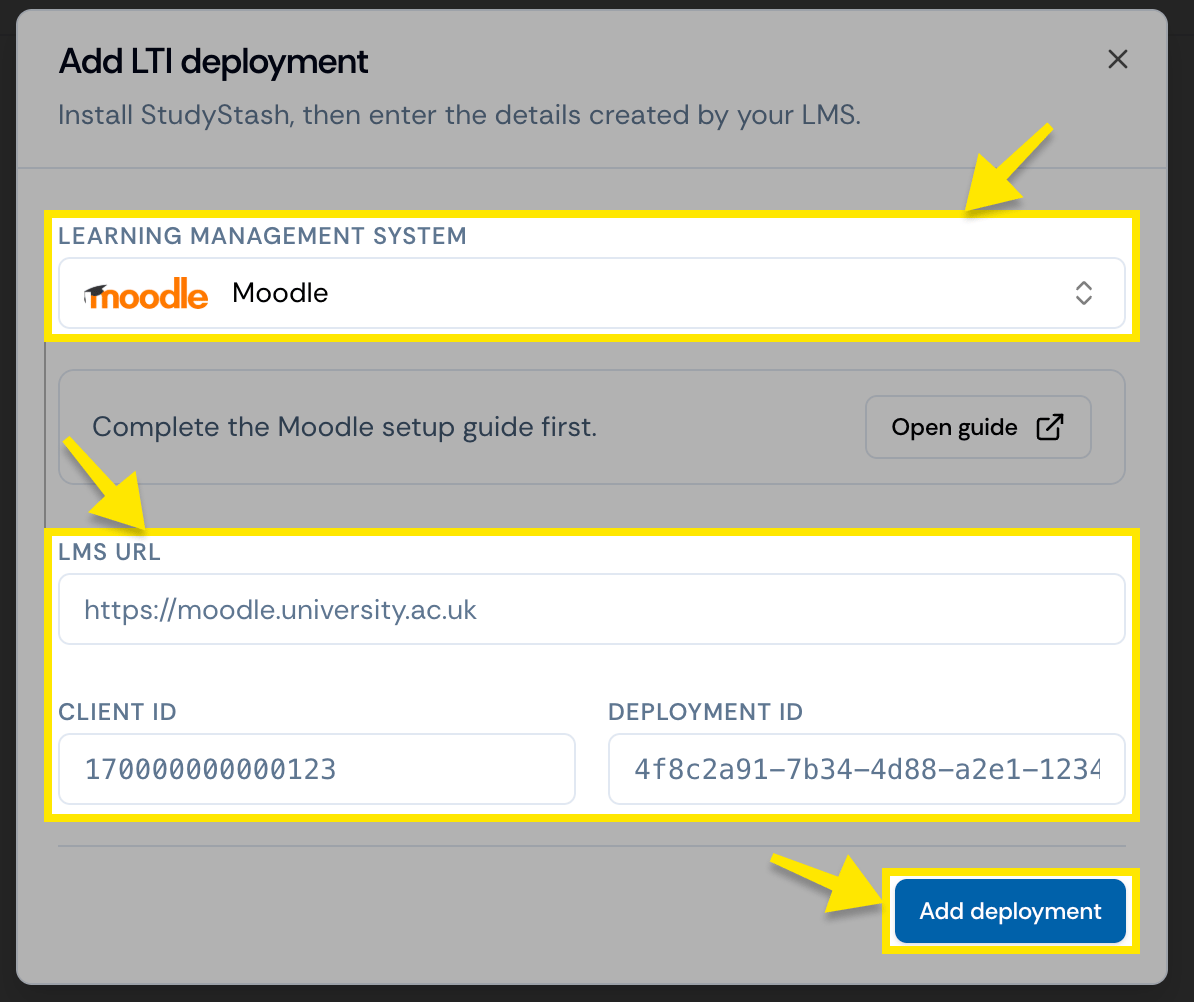
    The **Add LTI deployment** window will open.

    3. Select **Moodle** as the learning management system.

    4. Enter your institution’s **LMS URL**, **Client ID**, and **Deployment ID**.

    5. Select **Add deployment**.
    <Frame className="ss-screenshot" caption={"**Figure 5.** Moodle LTI Integration Guide (LTI) — screenshot"}>
      <img loading="lazy" src="https://mintcdn.com/studystash-help/FFz54l9hIeIDPaHl/assets/202145796/202178771-image-20260928-151644.png?fit=max&auto=format&n=FFz54l9hIeIDPaHl&q=85&s=63ca931c1d3dafe2c6b82320ae09ff27" alt="Moodle LTI Integration Guide (LTI) — screenshot" width="1194" height="1002" data-path="assets/202145796/202178771-image-20260928-151644.png" />
    </Frame>

    Once added, the deployment will appear under **LMS Integrations** with a **Connected** status, confirming that all required setup details have been entered.
  </Step>

  <Step titleSize="h2" title="Enable StudyStash to be opened in a new window">
    1. Inside the tool's settings (as configured in Step 1), locate **'Default launch container'** and select **'New window'**.

    2. Tick **'New window'**

    <Frame className="ss-screenshot" caption={"**Figure 6.** Moodle LTI Integration Guide (LTI) — screenshot"}>
      <img loading="lazy" src="https://mintcdn.com/studystash-help/FFz54l9hIeIDPaHl/assets/202145796/202145818-image-20260803-141852.png?fit=max&auto=format&n=FFz54l9hIeIDPaHl&q=85&s=fa4d3bbcb867bab6a8d148666f21f832" alt="Moodle LTI Integration Guide (LTI) — screenshot" width="2910" height="1558" data-path="assets/202145796/202145818-image-20260803-141852.png" />
    </Frame>

    <Frame className="ss-screenshot" caption={"**Figure 7.** Moodle LTI Integration Guide (LTI) — screenshot"}>
      <img loading="lazy" src="https://mintcdn.com/studystash-help/FFz54l9hIeIDPaHl/assets/202145796/202145815-screenshot-2026-08-03-at-15-22-15.png?fit=max&auto=format&n=FFz54l9hIeIDPaHl&q=85&s=ed4fd6b17bb95ab19bad157dbc638324" alt="Moodle LTI Integration Guide (LTI) — screenshot" width="1256" height="208" data-path="assets/202145796/202145815-screenshot-2026-08-03-at-15-22-15.png" />
    </Frame>

    <Frame className="ss-screenshot" caption={"**Figure 8.** Moodle LTI Integration Guide (LTI) — screenshot"}>
      <img loading="lazy" src="https://mintcdn.com/studystash-help/FFz54l9hIeIDPaHl/assets/202145796/202145812-screenshot-2026-08-03-at-15-23-27.png?fit=max&auto=format&n=FFz54l9hIeIDPaHl&q=85&s=8a9ed786abed5048d424932dbedc06fe" alt="Moodle LTI Integration Guide (LTI) — screenshot" width="1386" height="388" data-path="assets/202145796/202145812-screenshot-2026-08-03-at-15-23-27.png" />
    </Frame>
  </Step>
</Steps>


This documentation is built and hosted on [Mintlify](https://mintlify.com), a developer documentation platform.