> ## Documentation Index
> Fetch the complete documentation index at: https://help2.studystash.com/llms.txt
> Use this file to discover all available pages before exploring further.

# D2L Brightspace Integration Guide (LTI)

> Follow this installation guide to integrate StudyStash with D2L Brightspace using manual registration. StudyStash also supports dynamic registration upon request.

**For ADMINISTRATORS**

Follow this installation guide to integrate StudyStash with D2L Brightspace using manual registration. StudyStash also supports dynamic registration upon request.

## Prerequisites

You must have D2L Brightspace administrative access with the ability to manage LTI Advantage tools via Manage Extensibility.

***

## Step 1: Register StudyStash as an External Tool in Brightspace

1. Log in to D2L Brightspace with an administrator account

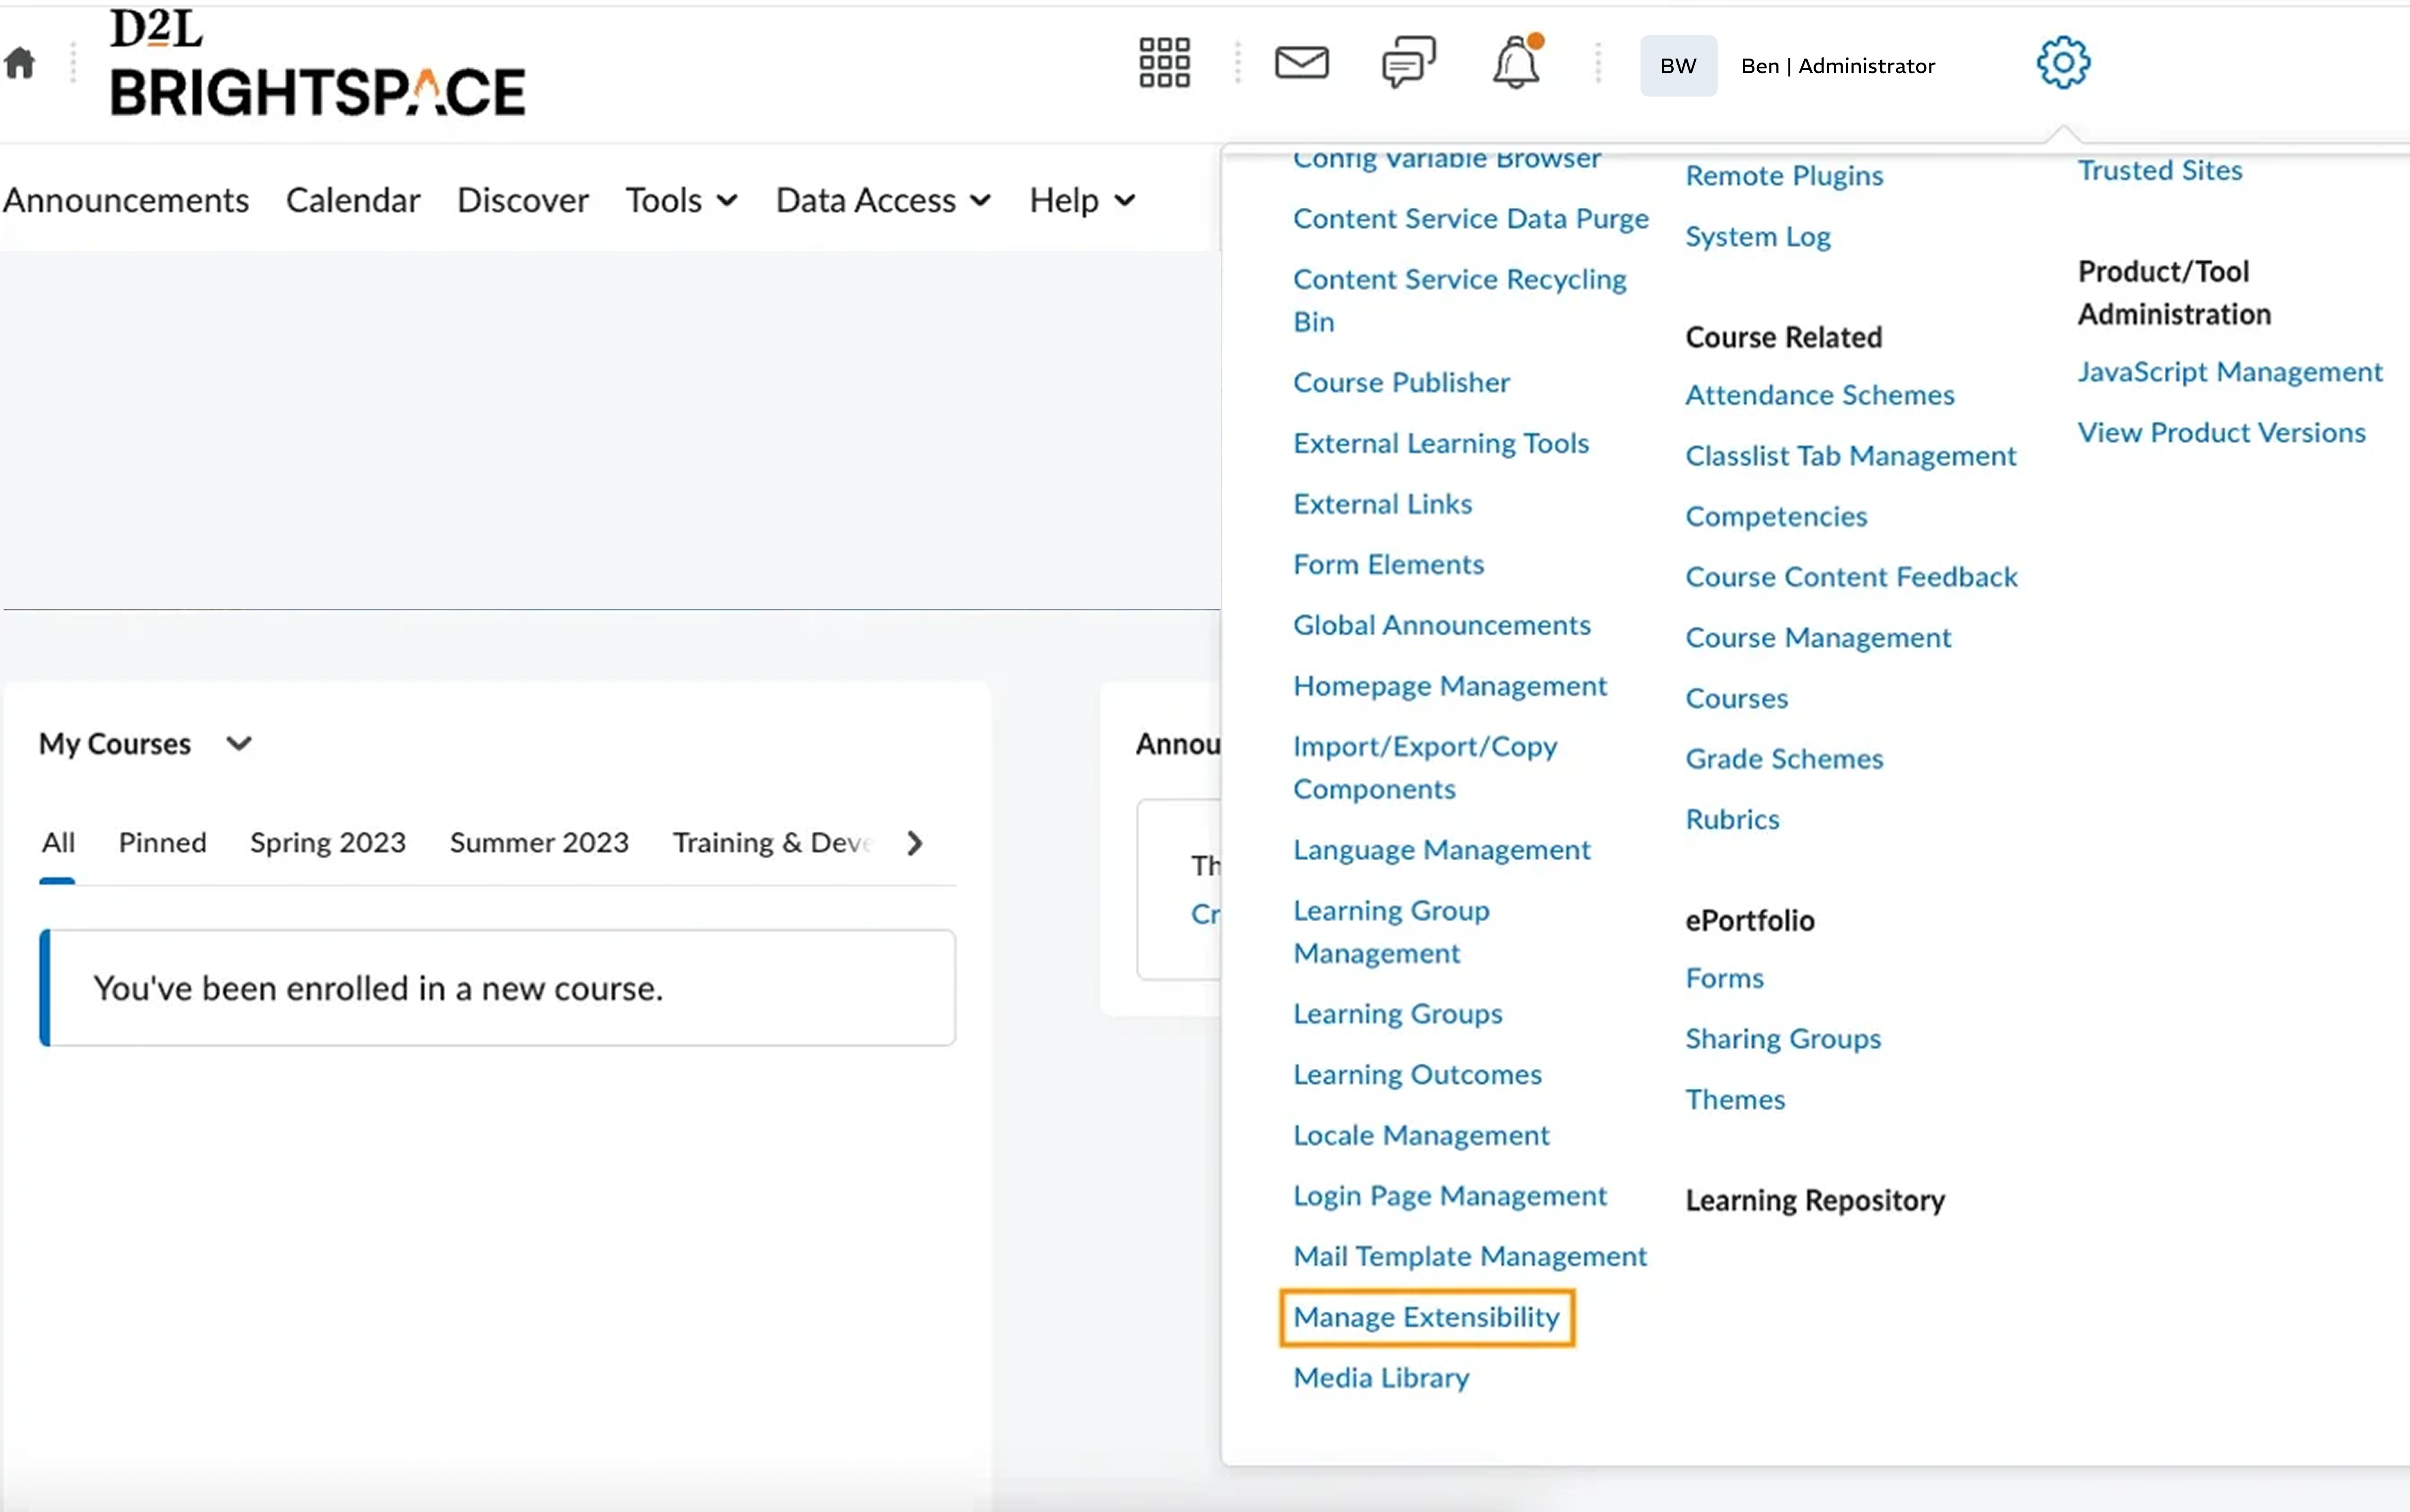
2. Click the **Settings cog** in the top right corner and select **Manage Extensibility**

<Frame className="ss-screenshot" caption={"**Figure 1.** Step "}>
  <img loading="lazy" src="https://mintcdn.com/studystash-help/FFz54l9hIeIDPaHl/assets/121176065/121896961-d2l-brightspace.png?fit=max&auto=format&n=FFz54l9hIeIDPaHl&q=85&s=75db113ca116a5f2a458f41245c9af57" alt="Step " width="5963" height="3742" data-path="assets/121176065/121896961-d2l-brightspace.png" />
</Frame>

3. Click the **LTI Advantage** tab

4. Click **Register Tool** and select **Standard Registration**
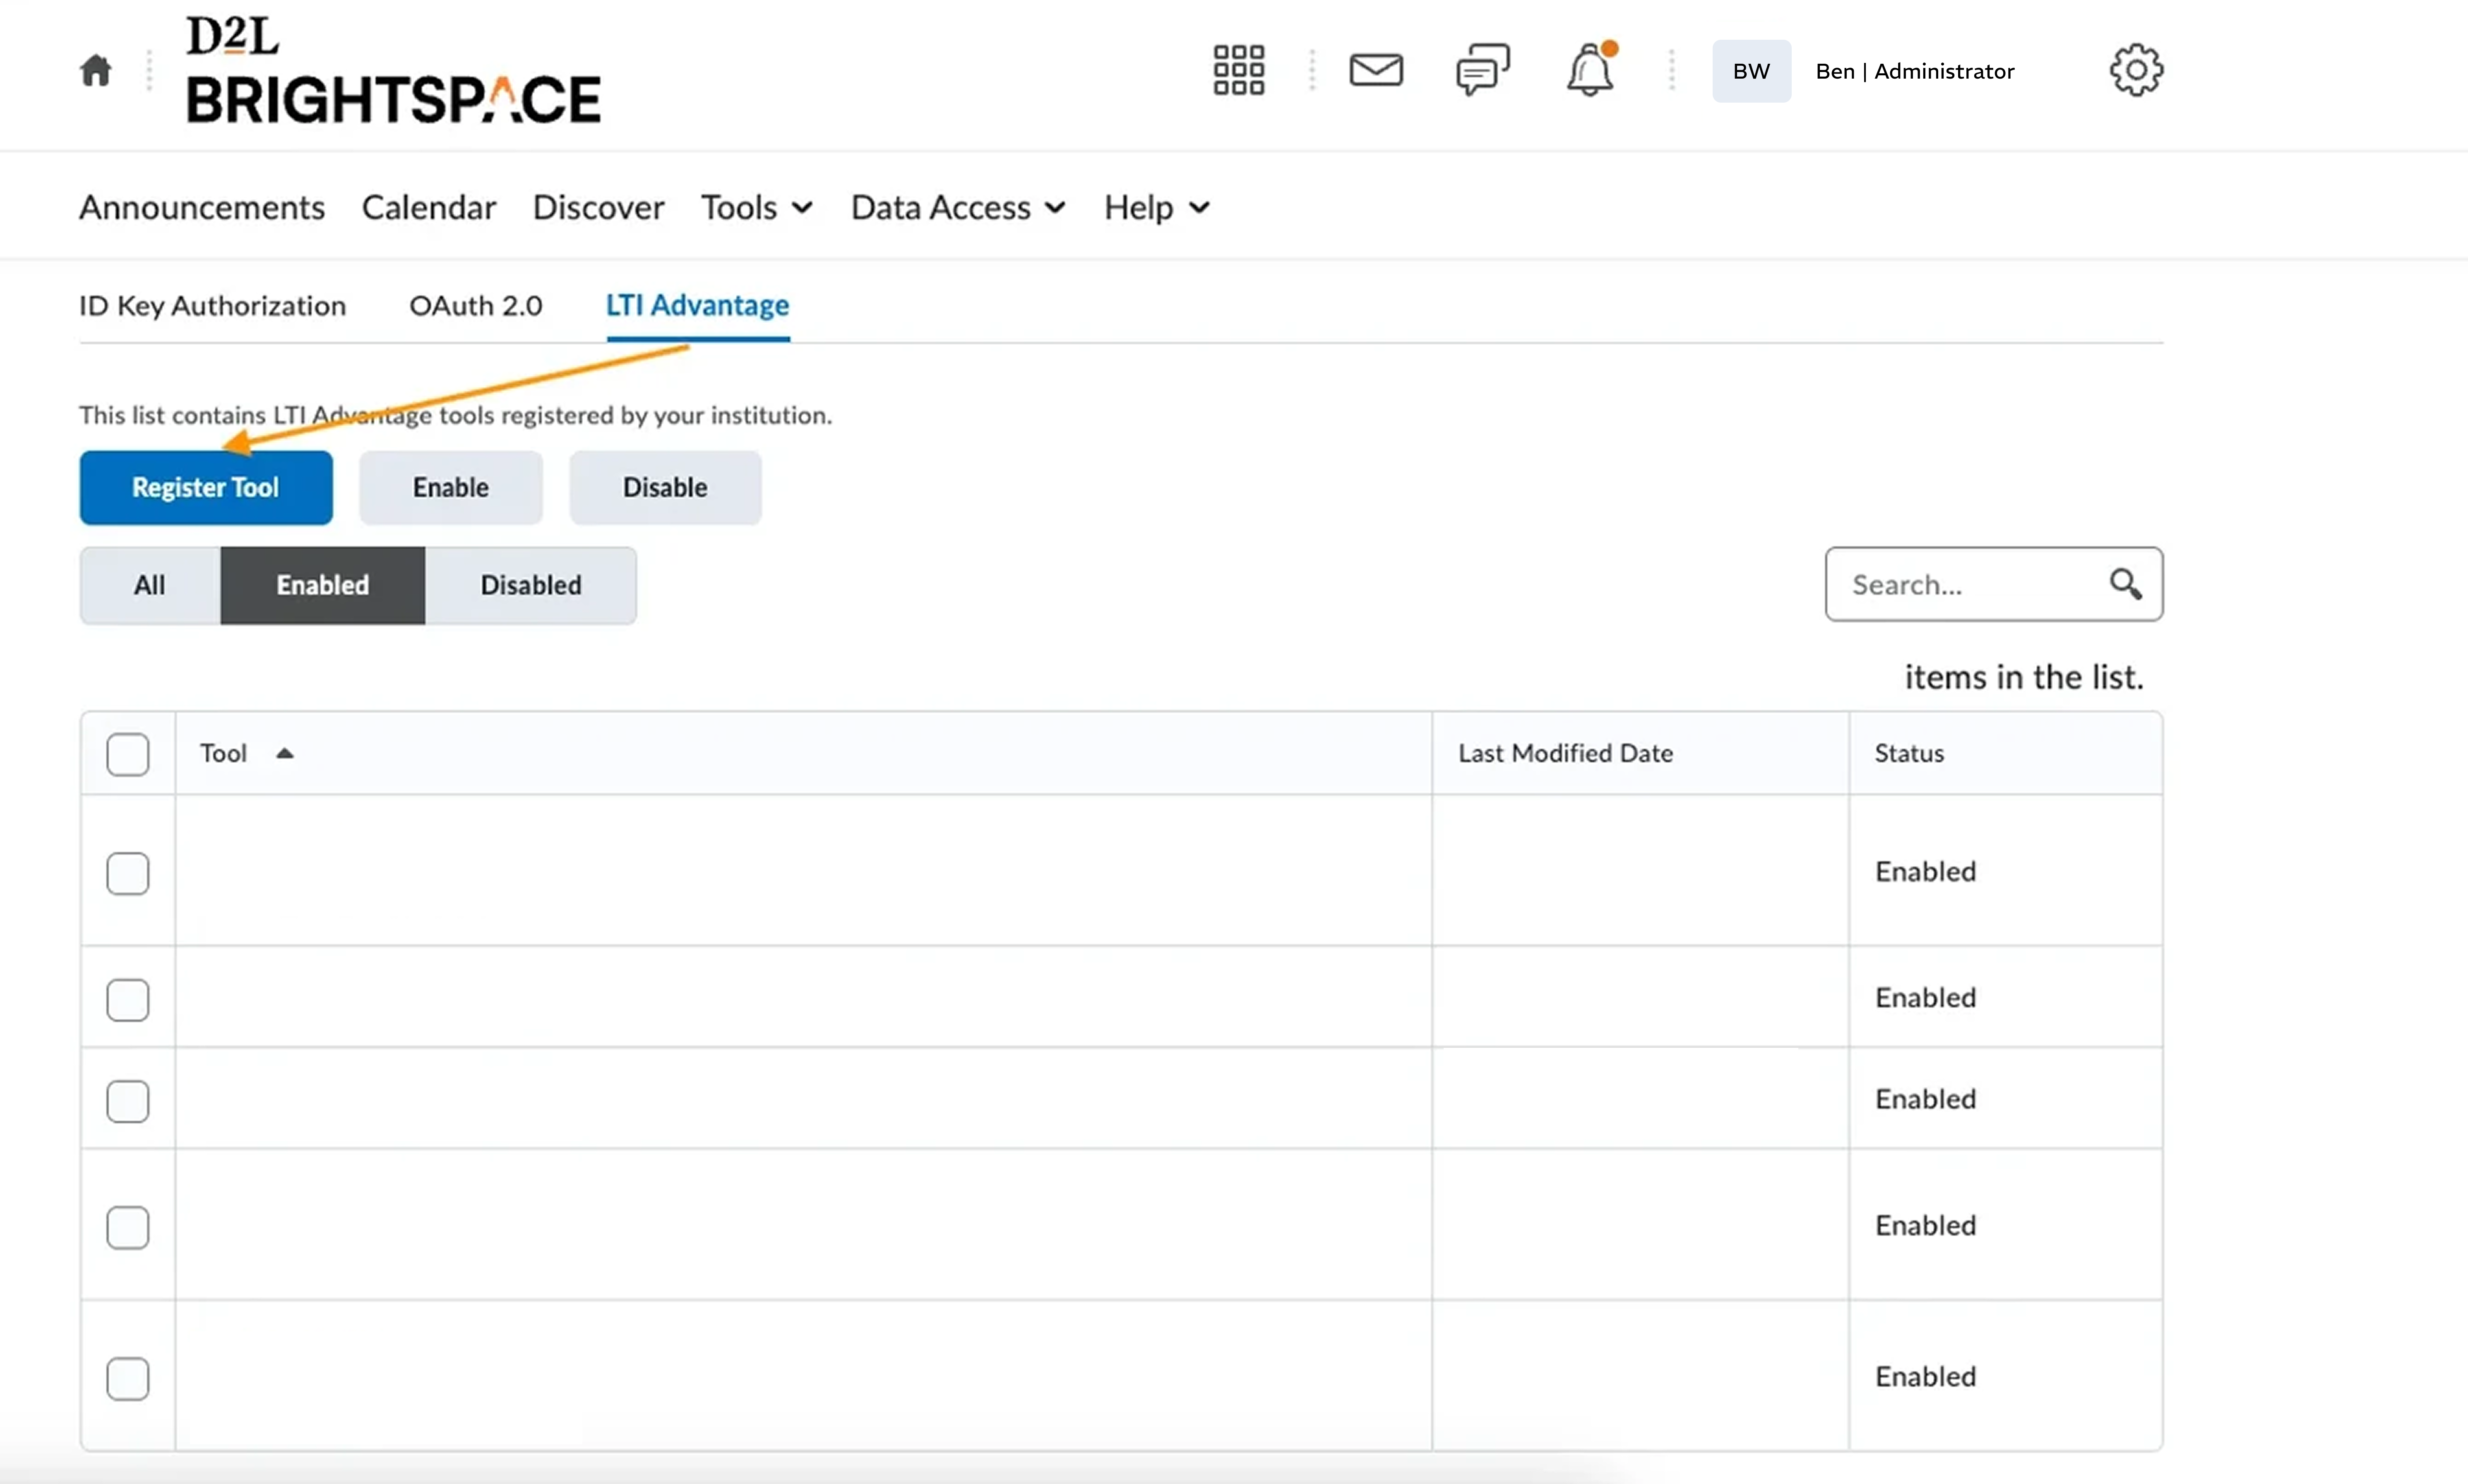
<Frame className="ss-screenshot" caption={"**Figure 2.** D2L Brightspace Integration Guide (LTI) — screenshot 2"}>
  <img loading="lazy" src="https://mintcdn.com/studystash-help/FFz54l9hIeIDPaHl/assets/121176065/121667593-d2l-brightspace-2.png?fit=max&auto=format&n=FFz54l9hIeIDPaHl&q=85&s=56a3de1de6cdc4da344ad2874c63f10f" alt="D2L Brightspace Integration Guide (LTI) — screenshot 2" width="5963" height="3586" data-path="assets/121176065/121667593-d2l-brightspace-2.png" />
</Frame>

5. Complete the fields using the information in the table below:

<table>
  <tbody>
    <tr>
      <th>
        <p><strong>Field</strong></p>
      </th>

      <th>
        <p><strong>Value</strong></p>
      </th>
    </tr>

    <tr>
      <td>
        <p>Tool</p>
      </td>

      <td>
        <p>Standard</p>
      </td>
    </tr>

    <tr>
      <td>
        <p>Enabled</p>
      </td>

      <td>
        <p>On</p>
      </td>
    </tr>

    <tr>
      <td>
        <p>Name</p>
      </td>

      <td>
        <p>StudyStash</p>
      </td>
    </tr>

    <tr>
      <td>
        <p>Domain</p>
      </td>

      <td>
        <p><a href="https://lti.studystash.com">[https://lti.studystash.com](https://lti.studystash.com)</a></p>
      </td>
    </tr>

    <tr>
      <td>
        <p>Redirect URL</p>
      </td>

      <td>
        <p><code>[https://lti.studystash.com/lti/launch](https://lti.studystash.com/lti/launch)</code></p>
      </td>
    </tr>

    <tr>
      <td>
        <p>OpenID Connect Login URL</p>
      </td>

      <td>
        <p><code>[https://lti.studystash.com/lti/login](https://lti.studystash.com/lti/login)</code></p>
      </td>
    </tr>

    <tr>
      <td>
        <p>Target Link URI</p>
      </td>

      <td>
        <p><code>[https://lti.studystash.com/lti/launch](https://lti.studystash.com/lti/launch)</code></p>
      </td>
    </tr>

    <tr>
      <td>
        <p>Keyset URL</p>
      </td>

      <td>
        <p><code>[https://lti.studystash.com/lti/keys](https://lti.studystash.com/lti/keys)</code></p>
      </td>
    </tr>
  </tbody>
</table>

6. Under **Extensions**, enable the following:

   1. Names and Role Provisioning Services (✅)

7. Under **Security Settings**, enable:

   1. Org unit information (✅)

   2. User information (✅)

   3. Link information (✅)

8. Click **Register**

9. You will receive a **Client ID** - copy and save this securely

***

## Step 2: Create a Deployment

1. From the confirmation modal, click **View Deployments**

2. Click **New Deployment**

3. Complete the fields using the information in the table below:

<table>
  <tbody>
    <tr>
      <th>
        <p><strong>Field</strong></p>
      </th>

      <th>
        <p><strong>Value</strong></p>
      </th>
    </tr>

    <tr>
      <td>
        <p>Tool</p>
      </td>

      <td>
        <p>StudyStash</p>
      </td>
    </tr>

    <tr>
      <td>
        <p>Name</p>
      </td>

      <td>
        <p>StudyStash</p>
      </td>
    </tr>

    <tr>
      <td>
        <p>Description</p>
      </td>

      <td>
        <p>Safe, AI-Powered Learning, all within your LMS</p>
      </td>
    </tr>
  </tbody>
</table>

4. Under **Security Settings**, enable:

   1. Org unit information (✅)

   2. User information (✅)

   3. Link information (✅)

5. Click **Add Org Units** to select the departments or courses you wish to deploy StudyStash to

6. Click **Create Deployment**

7. Take note of the **Deployment ID** - you will need this in Step 4

***

## Step 3: Add a Link

1. From the Deployment page, click **View Links**

2. Click **New Link**

3. Complete the fields using the information in the table below:

<table>
  <tbody>
    <tr>
      <th>
        <p><strong>Field</strong></p>
      </th>

      <th>
        <p><strong>Value</strong></p>
      </th>
    </tr>

    <tr>
      <td>
        <p>Name</p>
      </td>

      <td>
        <p>StudyStash</p>
      </td>
    </tr>

    <tr>
      <td>
        <p>URL</p>
      </td>

      <td>
        <p><code>[https://lti.studystash.com/lti/launch](https://lti.studystash.com/lti/launch)</code></p>
      </td>
    </tr>

    <tr>
      <td>
        <p>Type</p>
      </td>

      <td>
        <p>Basic Launch</p>
      </td>
    </tr>
  </tbody>
</table>

4. Click **Save and Close**

***

## Step 4: Provide Deployment Details to StudyStash

Before you can deploy to end-users, StudyStash requires the following details to enable the LTI integration.

<table>
  <tbody>
    <tr>
      <th>
        <p><strong>Field</strong></p>
      </th>
    </tr>

    <tr>
      <td>
        <p>Client ID</p>
      </td>
    </tr>

    <tr>
      <td>
        <p>Deployment URL</p>
      </td>
    </tr>

    <tr>
      <td>
        <p>Deployment ID</p>
      </td>
    </tr>
  </tbody>
</table>

**Enter your organisation's LTI details in the form below:**

[https://internal.support.studystash.com/servicedesk/customer/portal/34/group/107/create/273](https://internal.support.studystash.com/servicedesk/customer/portal/34/group/107/create/273)


This documentation is built and hosted on [Mintlify](https://mintlify.com), a developer documentation platform.