> ## Documentation Index
> Fetch the complete documentation index at: https://help2.studystash.com/llms.txt
> Use this file to discover all available pages before exploring further.

# Canvas LTI Integration Guide (LTI)

> Follow this installation guide to integrate StudyStash with Canvas using manual registration. StudyStash also supports dynamic registration upon request.

<Info>For institution administrators. Check the permissions below before you begin.</Info>

## Prerequisites

You must have Canvas administrative access with *Global Developer Key creation* permissions.

***

<Steps>
  <Step titleSize="h2" title="Add a developer LTI® key in Canvas">
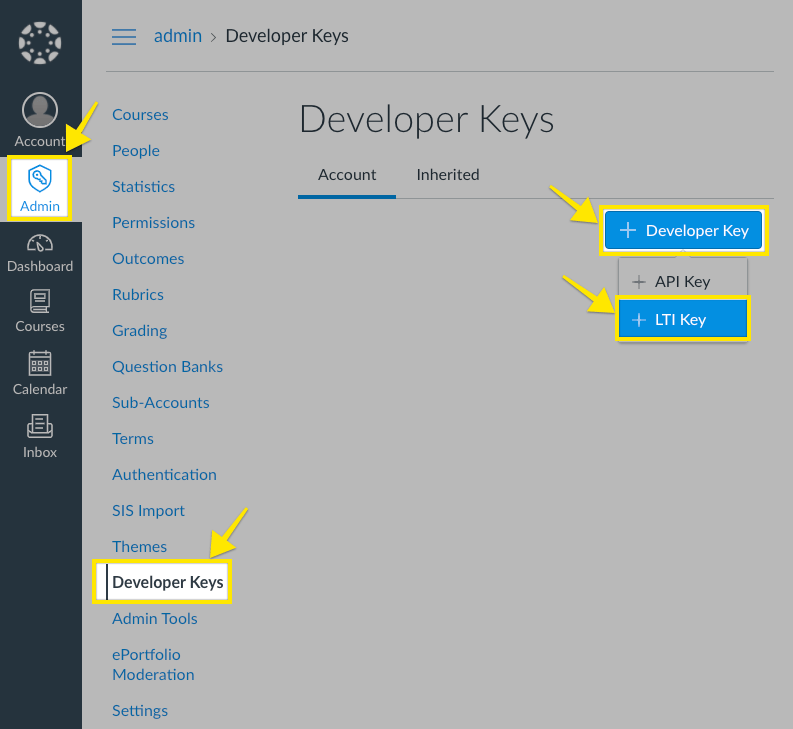
    1. Navigate to **'Admin'** -> **'Developer Keys'**

    2. Click the '**+ Developer Key**' button followed by the '**+ LTI® Key**' dropdown

    <Frame className="ss-screenshot" caption={"**Figure 1.** Canvas LTI Integration Guide (LTI) — screenshot"}>
      <img loading="lazy" src="https://mintcdn.com/studystash-help/FFz54l9hIeIDPaHl/assets/202276865/202276907-image-20251117-225521.png?fit=max&auto=format&n=FFz54l9hIeIDPaHl&q=85&s=c7ea770763f94b752865a994b89b32f2" alt="Canvas LTI Integration Guide (LTI) — screenshot" width="793" height="729" data-path="assets/202276865/202276907-image-20251117-225521.png" />
    </Frame>

    3. Enter the following information in ***Configure***:

    <table>
      <tbody>
        <tr>
          <th>
            <p><strong>Field</strong></p>
          </th>

          <th>
            <p><strong>Value</strong></p>
          </th>
        </tr>

        <tr>
          <td>
            <p>Method</p>
          </td>

          <td>
            <p>Manual Entry</p>
          </td>
        </tr>

        <tr>
          <td>
            <p>Key Name</p>
          </td>

          <td>
            <p>StudyStash</p>
          </td>
        </tr>

        <tr>
          <td>
            <p>Title</p>
          </td>

          <td>
            <p>StudyStash</p>
          </td>
        </tr>

        <tr>
          <td>
            <p>Description</p>
          </td>

          <td>
            <p>Safe, AI-Powered Learning, all within your LMS</p>
          </td>
        </tr>

        <tr>
          <td>
            <p>Redirection URI(s)</p>
          </td>

          <td>
            <p><code>[https://lti.studystash.com/lti/launch](https://lti.studystash.com/lti/launch)</code></p>
          </td>
        </tr>

        <tr>
          <td>
            <p>Target Link URI</p>
          </td>

          <td>
            <p><code>[https://lti.studystash.com/lti/launch](https://lti.studystash.com/lti/launch)</code></p>
          </td>
        </tr>

        <tr>
          <td>
            <p>OpenID Connect Initiation Url</p>
          </td>

          <td>
            <p><code>[https://lti.studystash.com/lti/login](https://lti.studystash.com/lti/login)</code></p>
          </td>
        </tr>

        <tr>
          <td>
            <p>JWK Method</p>
          </td>

          <td>
            <p>Public JWK URL</p>
          </td>
        </tr>

        <tr>
          <td>
            <p>Public JWK URL</p>
          </td>

          <td>
            <p><code>[https://lti.studystash.com/lti/keys](https://lti.studystash.com/lti/keys)</code></p>
          </td>
        </tr>
      </tbody>
    </table>

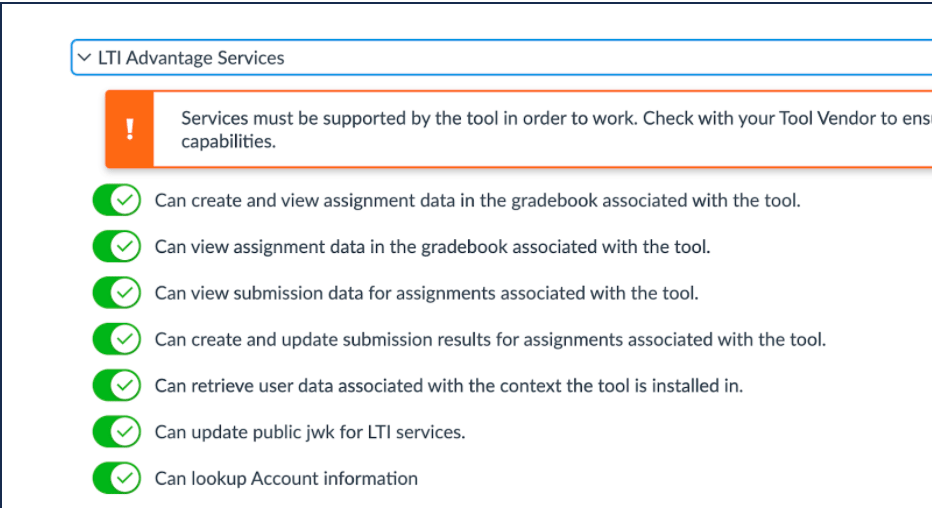
    4. Enable the following services in ***LTI Advantage Services***:

    <Frame className="ss-screenshot" caption={"**Figure 2.** Canvas LTI Integration Guide (LTI) — screenshot"}>
      <img loading="lazy" src="https://mintcdn.com/studystash-help/FFz54l9hIeIDPaHl/assets/202276865/202276901-image-20251117-230729.png?fit=max&auto=format&n=FFz54l9hIeIDPaHl&q=85&s=182eb36634ad00d9e4318b08d20c6675" alt="Canvas LTI Integration Guide (LTI) — screenshot" width="932" height="508" data-path="assets/202276865/202276901-image-20251117-230729.png" />
    </Frame>

    5. Enter the following information in ***Additional Settings***:

       1. Set **Icon Url** to [https://studystash.com/loop.png](https://studystash.com/loop.png)

       2. Set Privacy Level to **Public**

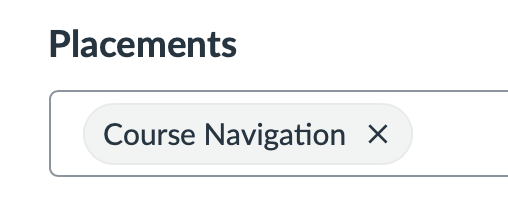
       3. Select **Course Navigation** in Placements:
              <Frame className="ss-screenshot" caption={"**Figure 3.** Canvas LTI Integration Guide (LTI) — screenshot"}>
                <img loading="lazy" src="https://mintcdn.com/studystash-help/FFz54l9hIeIDPaHl/assets/202276865/202276895-image-20251117-232658.png?fit=max&auto=format&n=FFz54l9hIeIDPaHl&q=85&s=2c661aabf0f18d8012b83b12864873b0" alt="Canvas LTI Integration Guide (LTI) — screenshot" width="508" height="200" data-path="assets/202276865/202276895-image-20251117-232658.png" />
              </Frame>

    6. Click the **Save** button<strong>:</strong><br />

           <Frame className="ss-screenshot" caption={"**Figure 4.** Canvas LTI Integration Guide (LTI) — screenshot"}>
             <img loading="lazy" src="https://mintcdn.com/studystash-help/FFz54l9hIeIDPaHl/assets/202276865/202276892-image-20251117-232818.png?fit=max&auto=format&n=FFz54l9hIeIDPaHl&q=85&s=99c43e2b9bee02bd58dcd56696a6e55c" alt="Canvas LTI Integration Guide (LTI) — screenshot" width="941" height="115" data-path="assets/202276865/202276892-image-20251117-232818.png" />
           </Frame>

    7. **Enable** the state of the Developer Key, and take note of the **Client ID** in the Details column:<br />

           <Frame className="ss-screenshot" caption={"**Figure 5.** Canvas LTI Integration Guide (LTI) — screenshot"}>
             <img loading="lazy" src="https://mintcdn.com/studystash-help/FFz54l9hIeIDPaHl/assets/202276865/202276889-image-20251117-233013.png?fit=max&auto=format&n=FFz54l9hIeIDPaHl&q=85&s=19f1f7f185f5eb1e85ca3674b651abc9" alt="Canvas LTI Integration Guide (LTI) — screenshot" width="2628" height="298" data-path="assets/202276865/202276889-image-20251117-233013.png" />
           </Frame>
  </Step>

  <Step titleSize="h2" title="Install StudyStash into Canvas">
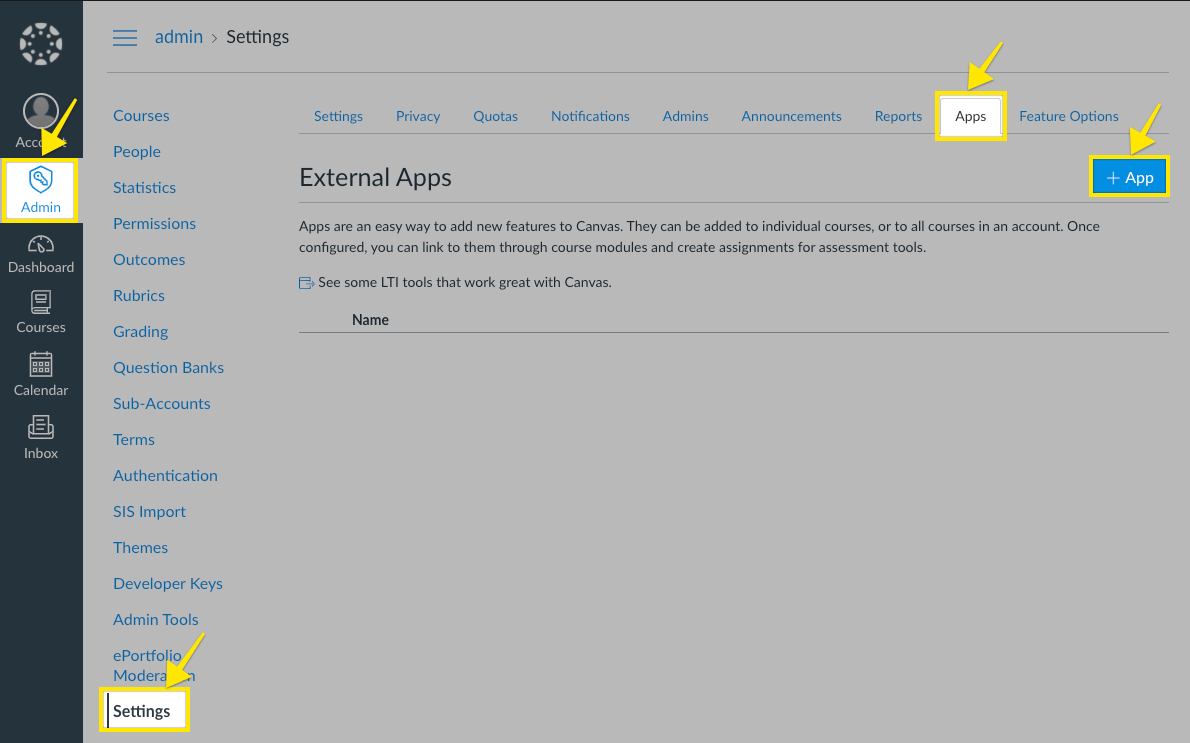
    1. In the Canvas **Admin menu**, navigate to '**Settings**' -> '**Apps**'

    2. Click the '**+ App**' button<br />

           <Frame className="ss-screenshot" caption={"**Figure 6.** Canvas LTI Integration Guide (LTI) — screenshot"}>
             <img loading="lazy" src="https://mintcdn.com/studystash-help/FFz54l9hIeIDPaHl/assets/202276865/202276886-image-20251117-233304.png?fit=max&auto=format&n=FFz54l9hIeIDPaHl&q=85&s=a179bdea03f34869a9d83efa1bd66883" alt="Canvas LTI Integration Guide (LTI) — screenshot" width="1190" height="743" data-path="assets/202276865/202276886-image-20251117-233304.png" />
           </Frame>

    3. Enter the following information:

    <table>
      <tbody>
        <tr>
          <th>
            <p><strong>Field</strong></p>
          </th>

          <th>
            <p><strong>Value</strong></p>
          </th>
        </tr>

        <tr>
          <td>
            <p>Configuration Type</p>
          </td>

          <td>
            <p>By Client ID</p>
          </td>
        </tr>

        <tr>
          <td>
            <p>Key Name</p>
          </td>

          <td>
            <p><code>\[Client ID from Step 1]</code></p>
          </td>
        </tr>
      </tbody>
    </table>

    4. Click **Submit**

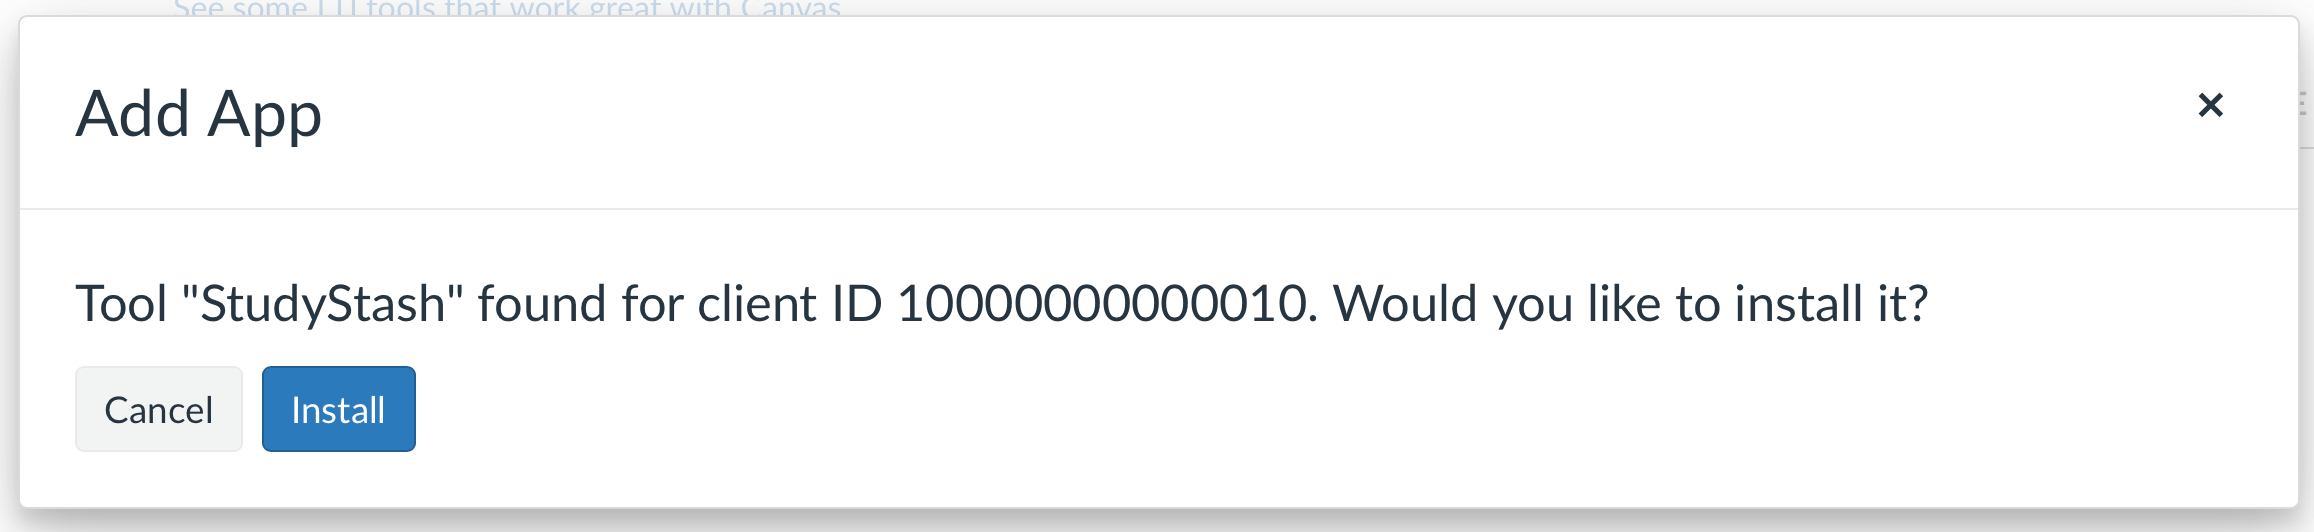
    5. In the following dialog, click **Install** when prompted:<br />

           <Frame className="ss-screenshot" caption={"**Figure 7.** Canvas LTI Integration Guide (LTI) — screenshot"}>
             <img loading="lazy" src="https://mintcdn.com/studystash-help/FFz54l9hIeIDPaHl/assets/202276865/202276883-image-20251117-234014.png?fit=max&auto=format&n=FFz54l9hIeIDPaHl&q=85&s=e00e9712cbca44788e5b3cdab97c344e" alt="Canvas LTI Integration Guide (LTI) — screenshot" width="2314" height="532" data-path="assets/202276865/202276883-image-20251117-234014.png" />
           </Frame>

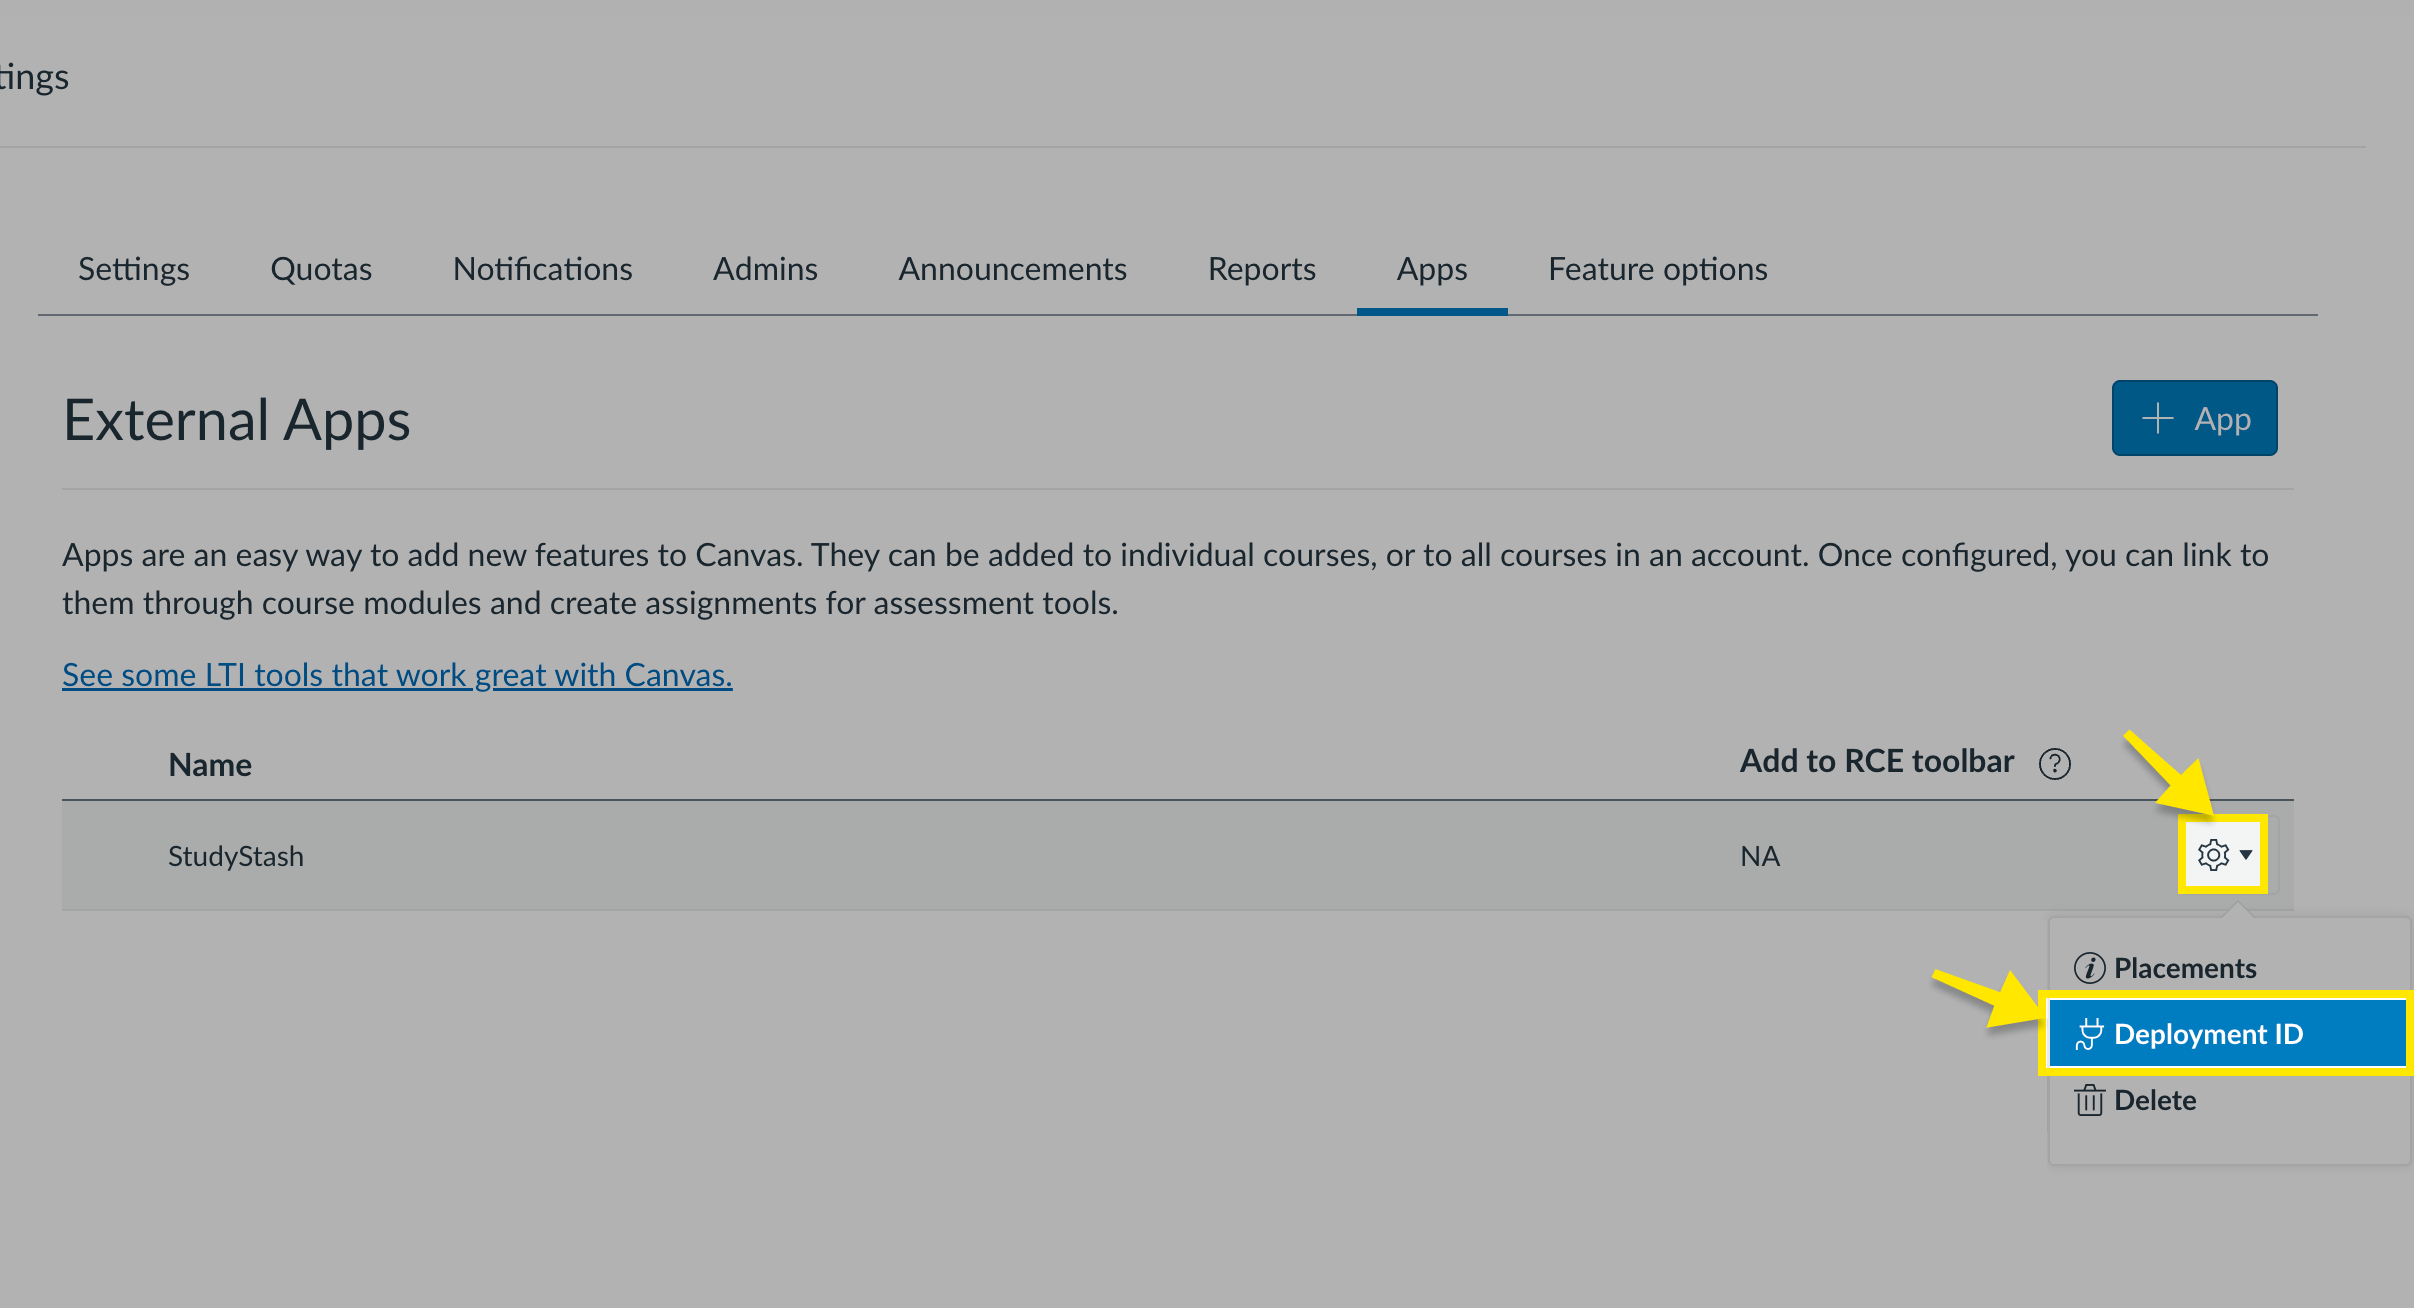
    6. On the **app** row that you’ve just created, open the **Settings** menu, select **Deployment ID**, and copy the value. You will need it in Step 3.<br />
           <Frame className="ss-screenshot" caption={"**Figure 8.** Canvas LTI Integration Guide (LTI) — screenshot"}>
             <img loading="lazy" src="https://mintcdn.com/studystash-help/FFz54l9hIeIDPaHl/assets/202276865/202473480-image-20260928-144908.png?fit=max&auto=format&n=FFz54l9hIeIDPaHl&q=85&s=ac2048fb5e397672caa472a13a70548f" alt="Canvas LTI Integration Guide (LTI) — screenshot" width="2414" height="1308" data-path="assets/202276865/202473480-image-20260928-144908.png" />
           </Frame>

    7. Check StudyStash is present in Course Navigation as expected<br />
    <Note>
      Canvas has guidance in managing Course Navigation links:

      [https://community.canvaslms.com/t5/Instructor-Guide/How-do-I-manage-Course-Navigation-links/ta-p/1020](https://community.canvaslms.com/t5/Instructor-Guide/How-do-I-manage-Course-Navigation-links/ta-p/1020)
    </Note>
  </Step>

  <Step titleSize="h2" title="Add your Canvas deployment to StudyStash">
    Before end users can launch StudyStash from Canvas, add the Canvas deployment in the [StudyStash Admin Dashboard](https://studystash.com/admin).

    1. Sign in to the [StudyStash Admin Dashboard](https://studystash.com/admin).

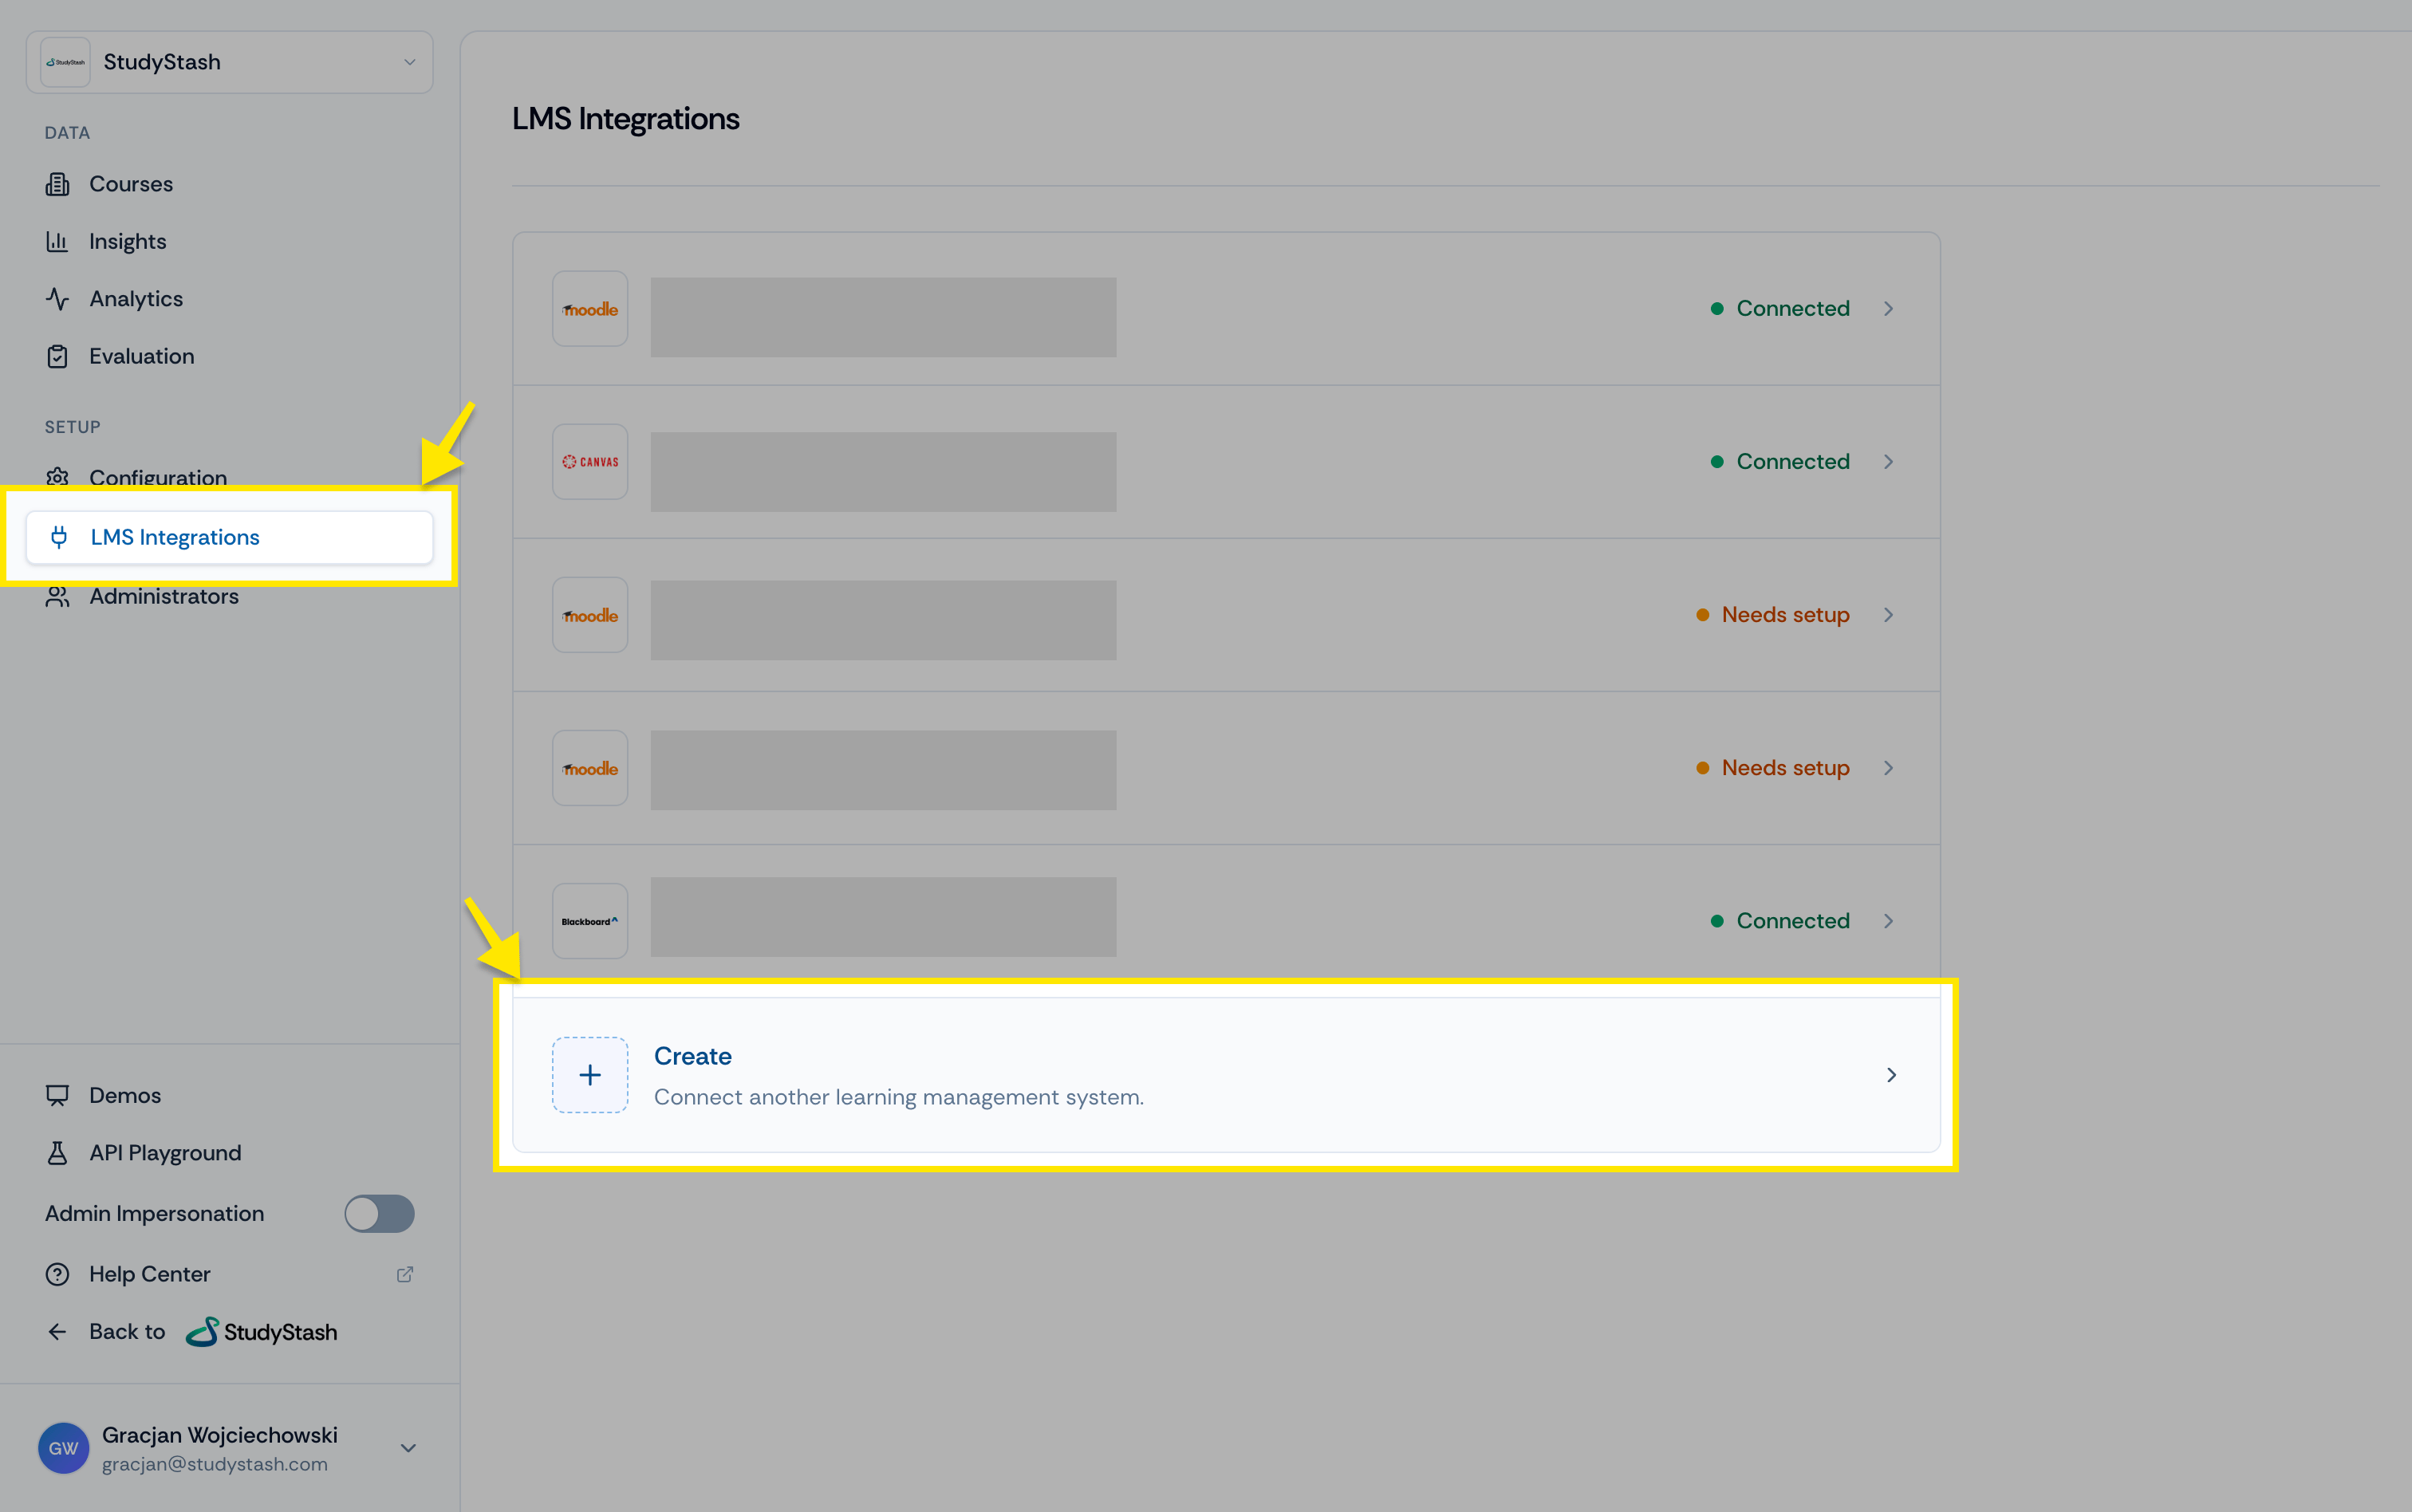
    2. Under **Setup**, select **LMS Integrations**, then select **Create**.

    <Frame className="ss-screenshot" caption={"**Figure 9.** Canvas LTI Integration Guide (LTI) — screenshot"}>
      <img loading="lazy" src="https://mintcdn.com/studystash-help/FFz54l9hIeIDPaHl/assets/202145796/202473493-image-20260928-151614.png?fit=max&auto=format&n=FFz54l9hIeIDPaHl&q=85&s=058cfea38e19fcdd412da89b0ea34294" alt="Canvas LTI Integration Guide (LTI) — screenshot" width="3024" height="1896" data-path="assets/202145796/202473493-image-20260928-151614.png" />
    </Frame>

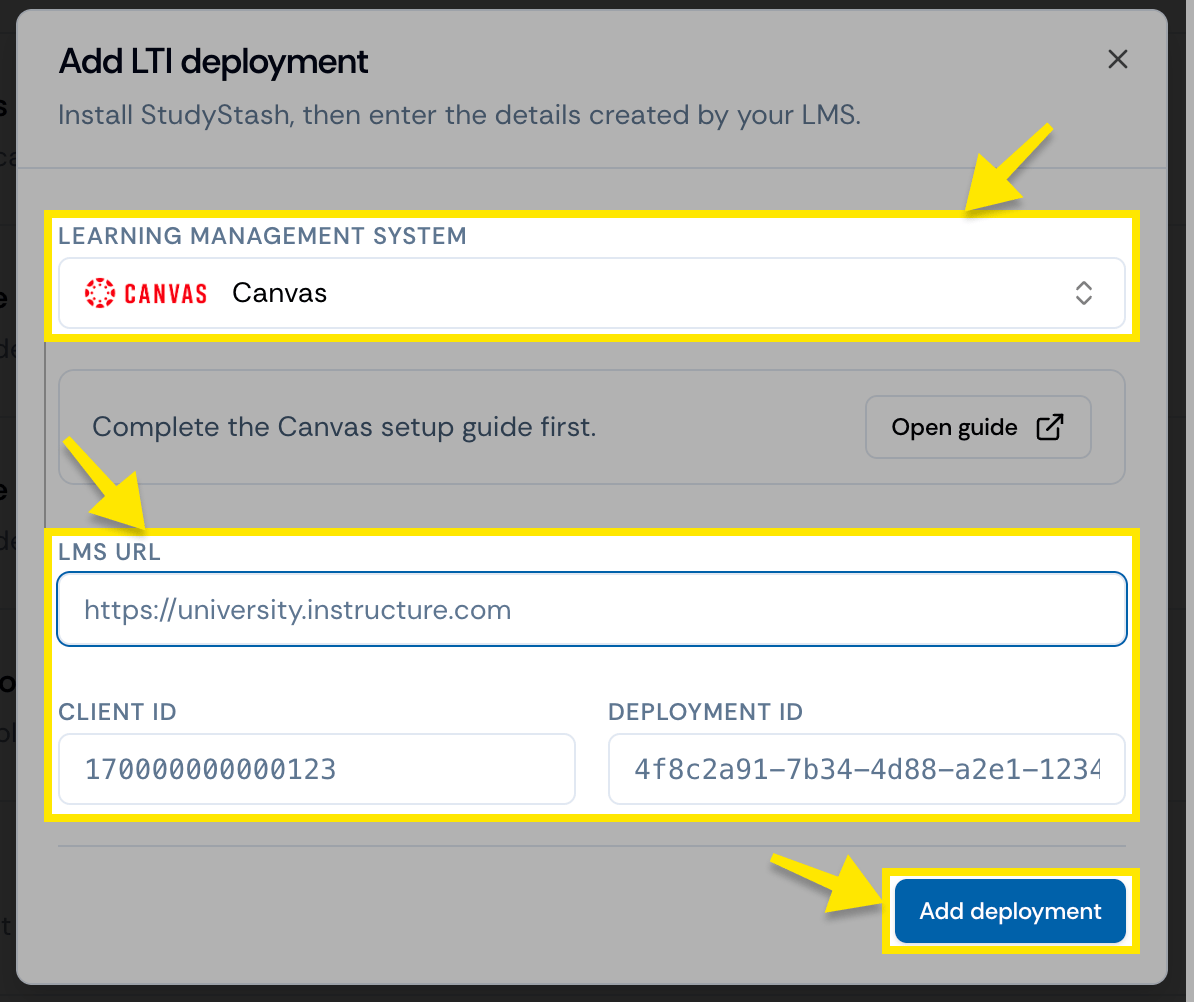
    The **Add LTI deployment** window will open.

    3. Select **Canvas** as the learning management system.

    4. Enter your institution’s **LMS URL**, **Client ID**, and **Deployment ID**.

    5. Select **Add deployment**.
    <Frame className="ss-screenshot" caption={"**Figure 10.** Canvas LTI Integration Guide (LTI) — screenshot"}>
      <img loading="lazy" src="https://mintcdn.com/studystash-help/FFz54l9hIeIDPaHl/assets/202276865/202473474-image-20260928-142458.png?fit=max&auto=format&n=FFz54l9hIeIDPaHl&q=85&s=722e9cecfe1c0351b0c776e9a2b8cb05" alt="Canvas LTI Integration Guide (LTI) — screenshot" width="1194" height="1002" data-path="assets/202276865/202473474-image-20260928-142458.png" />
    </Frame>

    Once added, the deployment will appear under **LMS Integrations** with a **Connected** status, confirming that all required setup details have been entered.
  </Step>
</Steps>


This documentation is built and hosted on [Mintlify](https://mintlify.com), a developer documentation platform.